Wednesday, February 27, 2019

Oh Gnome! - CTD532

Hello! I hope your week is going well. It’s Wednesday and time for a new Color Throwdown Challenge.
Yesterday I was excited to get my hands on some of the new Lawn Fawn spring release and the first set I dove into was the Oh Gnome! set with the adorable gnomes, mushrooms and garden images. To create my card, I stamped a bunch of the images from the Oh Gnome stamp set then colored them with Copic markers and die cut them out using the Oh Gnome dies. Next I used the new Mushroom House die and die cut the base of the mushroom from cream cardstock, the top from some coral cardstock and the door and window from some Knock on Wood paper. There are so many fun pieces to this Mushroom House die, I can’t wait to use it again! Once all of my pieces from the house were die cut, I did some ink blending. I used some antique linen oxide ink on the base, some abandoned coral and candied apple on the top of the mushroom and some lucky clover on the grass I die cut using the Grassy Hillside Borders die. For the background on my card, I used a piece of the new Gotta Have Gingham paper which I die cut using the Outside in Stitched Rectangle Stackables die. For the clouds, I used the Starry Backdrops set and hand cut the clouds out since I don’t have the dies. For my sentiment, I stamped the happy birthday onto an Everyday Sentiment Banners and stamped the other half along the bottom of my card. I popped up the two gnomes, the gift and the small mushroom with foam tape and...if you look at the bottom picture in this post you can see what’s behind the door of the mushroom house.
I was going to stamp another message behind the door or another gnome but instead decided to add a fun little snail from the Gleeful Garden set.
For more inspiration, check out the design teams blog links below or you can go to the Color Throwdown blog for details on how to play along and see all of the sample entries in one location.

Amy Rohl
Amy Rysavy
Leigh O'Brien - February Guest Designer

Thanks so much for stopping by!

Don't forget, you can follow me on InstagramTwitter and Pinterest to see what I'm up to.

Wednesday, February 20, 2019

Hello Friend - CTD531

Hello there! It’s time for this week’s Color Throwdown Challenge. We have the colors rust, purple, gray and white to create with and we hope you’ll play along.
For my card, I used the Hello Bluebird stamp set McGregor’s Garden along with the coordinating McGregor’s Garden dies to create a friendship card. I started out with a white card base, added a piece of purple gingham Doodlebug paper which I die cut using the Outside In Stitched Rectangle Stackables dies. Next I used the same rectangle dies to die cut a piece of white cardstock and used the Hello Bluebird stamp set Cheery Greetings to stamp my sentiment using my Misti tool. After that I used some kraft colored Doodlebug paper and die cut my hills using the Stitched Hillside Borders dies then blended on some frayed burlap oxide ink along the edges. I stamped my images onto white cardstock and colored them with Copic markers then die cut them out and adhered them to my scene, popping up the two bunnies and one of the birds with foam tape.
For more inspiration, check out the design teams blog links below or you can go to the Color Throwdown blog for details on how to play along and see all of the sample entries in one location.

Amy Rohl
Amy Rysavy

Leigh O'Brien - February Guest Designer

Thanks so much for stopping by!

Don't forget, you can follow me on InstagramTwitter and Pinterest to see what I'm up to.

Thursday, February 14, 2019

Just a Little Note to Say...

 Happy Valentine’s Day! Today I’m sharing a couple of Valentine’s I created earlier this week for my sons. I used the Lawn Fawn stamp set Critter Concert along with the coordinating Critter Concert dies. These little critters from this set are adorable. 
I stamped out a bunch of the images from the Critter Concert set and colored them with Copic markers then die cut them out. For both cards I used the Outside In Stitched Rectangle Stackables dies and cut two white rectangles for my images and two black Doodlebug gingham pieces of paper. I also stamped both of the Happy Valentine’s Day sentiments onto a white banner and used some Knock on Wood paper as a base or floor for my critters. For both cards, I stamped some little red hearts and used the Little Music Notes dies and die cut some notes for around the critters.
The raccoon card is for my youngest since he plays the flute.
Thanks for stopping by!


Wednesday, February 13, 2019

Hope Your Day Sparkles - CTD530

Happy Wednesday! We have a new Color Throwdown Challenge that starts today with some fantastic colors to create with. We hope you stop by and play along.
Today I have a fun Valentine shaker card that I created with the Lawn Fawn stamp set Fairy Friends along with the coordinating Fairy Friends dies. To create my card, I started out with a square card base then used I used the Outside In Stitched Square Stackables die with some white cardstock and added that to my card base. Next I added a piece of gingham pink Doodlebug paper. After that, I stamped all of my images, I stamped two of the larger fairies and the flowers from the Fairy Friends set and I stamped the unicorn and mini fairies from the A Little Sparkle stamp set. Once my images were stamped, I colored them with Copic markers and die cut them out. Once that was done, I die cut three of the same size circles from the Stitched Scalloped Circle Frames, one from cardstock and the other two from adhesive foam. I also die cut two circles larger than the opening for my shaker, one circle from clear acetate and the other from white cardstock. I took the die cut cardstock circle and blended on some seedless preserves and picked raspberry distress oxide ink and then stamped my sentiment in the center and glued on two of the mini fairies for the inside of my shaker. For the bottom of my card, I adhered my floral images and my Valentine sentiment from the Happy, Happy Happy Add On set which I stamped onto a white banner. Then I filled my shaker with sequins and adhered all of layers of my shaker together to seal it up then attached it to my card front. I added the two large fairies and my unicorn along the frame of the shaker and then added some gold glitter to the one fairies wand and the unicorns horn and some Wink of Stella clear glitter pen over the fairies dresses, wings, the flowers and the unicorn’s tail and mane.
I made a coordinating tag to tie up some Valentine goodies. I used the A Little Sparkle set and dies along with the Stitched Circle Tags die, a scallop circle die and some rhinestones.
For more inspiration, check out the design teams blog links below or you can go to the Color Throwdown blog for details on how to play along and see all of the sample entries in one location.

Amy Rohl
Amy Rysavy

Leigh O'Brien - February Guest Designer

Thanks so much for stopping by!

Don't forget, you can follow me on InstagramTwitter and Pinterest to see what I'm up to.

Wednesday, February 6, 2019

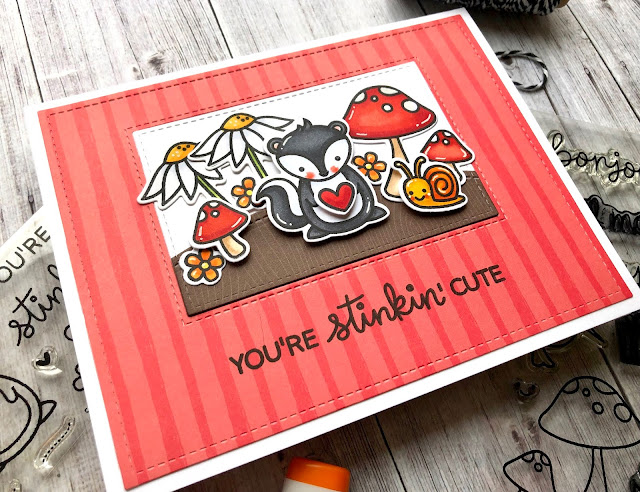
You’re Stinkin’ Cute - CTD529

Hello, crafty friends! It’s Wednesday and time for a new Color Throwdown Challenge. Before I get to my card, I’d like to welcome this month’s talented guest designer, Leigh O'Brien 
For my card, I used the Lawn Fawn stamp set Stinkin’ Cute along with the Stinkin’ Cute die set to create a Valentine. I started out by stamping the cute little skunk, heart and flowers from the set and then decided that the skunk need a setting so I pulled out the Gleeful Gardens stamp set and Gleeful Gardens dies and stamped some mushrooms, flowers and a snail then colored all of the images with Copic markers and die cut them out. I used the Outside In Stitched Rectangle Stackables dies to die cut a piece of Really Rainbow paper and a white rectangle for my images. Then I used the same rectangle die to die cut a rectangle into my red striped really rainbow paper so that my white rectangle would fit flush within the opening. After that, I die cut a piece of Knock on Wood paper with the rectangle die then with the Simple Stitched Hillside Borders die then added my images, popping up the skunk, heart, small mushroom and snail. I stamped the sentiment from the Stinkin’ Cute set, using my Misti tool, under my images and as a final touch I used a Glaze pen on the skunks nose and eyes.
For more inspiration, check out the design teams blog links below or you can go to the Color Throwdown blog for details on how to play along and see all of the sample entries in one location.
Amy Rohl
Amy Rysavy
Leigh O'Brien - February Guest Designer

Thanks so much for stopping by!

Don't forget, you can follow me on InstagramTwitter and Pinterest to see what I'm up to.

Sunday, February 3, 2019

Rub-A-Dub-Dub - Day 4 Card Series

Good Sunday morning to you! Today I’m sharing the final card in my Rub-A-Dub-Dub card series that I’ve posting here on my blog. The card I have for today is a pop-up card using some of the same supplies I used to create my previous cards on Day 1, Day 2 and Day 3.
To create my card, I used the Lawn Fawn stamp set Rub-A-Dub-Dub along with the Rub-A-Dub-Dub dies. The first thing I did was to stamp more of the images from the Rub-A-Dub-Dub set and color them with Copic markers then die cut them out. I used a bunch of images from the set and colored a lot of bubbles. Next I used the Scalloped Box Card Pop-up die and die cut all of the main pieces from white cardstock. After that, I die cut the side panel pieces to the box from some Doodlebug aqua gingham paper. Since I wanted to make it look like my ducks were standing in bubbles, I using the Puffy Cloud Borders dies and die cut pieces from white cardstock to fit inside the box and around the bottoms of each outside panel which you can see in the photos above. I used the Fancy Folded Banners die and die cut it from a piece of Knit Picky paper for part of my sentiment which I attached to the upper back panel and the second part of my sentiment I stamped on the front panel. I used Glossy Accents on several of the bubbles to give them a wet look and used foam tape to adhere some of the ducks and bubbles throughout the card.
Thanks so much for stopping by!

Friday, February 1, 2019

Rub-A-Dub-Dub - Day 3 Card Series

Hi there! I’m back for Day 3 of my Rub-A-Dub-Dub Card series and today I have a square card that could be used as either a Mother’s Day card or a birthday card. If you’d like to see Day 1 and Day 2 in this series, you can either scroll down or click here and here.
To create my card, I used a square card base then added a piece of bright yellow gingham Doodlebug paper and then die cut a scalloped circle using the Stitched Scalloped Circle Frames die. Next I used the same die to die cut a piece of Knock on Wood paper for the floor and then I stamped part of my sentiment onto the top of my circle and the other half onto a die cut banner for the bottom. I already had a bunch of the images from the Rub-A-Dub-Dub set stamped and colored with Copic markers so all I had to do was use the Rub-A-Dub-Dub dies to die cut them out. For this card, I used the large duck in the tub, added extra bubbles, the shower and the rubber duck. I popped up the tub with the duck in it using foam tape and added some Glossy Accents to several of the bubbles.