Wednesday, August 26, 2020

Silly Bird Birthday Card - CTD608

Hello crafty friends! I’m hostess for this week’s Color Throwdown Challenge and I’ve chosen the colors orange, pink, yellow and peach which I thought would be pretty colors to create with.  
To create my card, I used the fun Hello Bluebird stamp set, Silly Birds with the coordinating Silly Birds dies. I think one of my current favorite ways to create a simple card is how I created my card today, which I’ve done before and I like the results. I used my Outside In Stitched Rectangle dies and die cut a piece of thick card stock and then used it as a stencil to blend on color like I did for my card today where I blended on some spun sugar distress oxide ink. It's a simple way to lay down some color to ground your images.
I had stamped and die cut a bunch of these adorable bird images from the Silly Bird set so all I had to do was color them with Copic markers, figure out my layout, stamp my sentiment and then adhere my images, popping up three of the birds with foam tape. I also added some glitter to the one birds party hat and some Glossy Accents to the eyes of all the birds.
For more inspiration, check out the design teams blog links below or you can go to the Color Throwdown blog for details on how to play along and see all of the sample entries in one location.

Amy Rohl
Amy Rysavy
Thanks so much for stopping by!
Don't forget, you can follow me on InstagramTwitter and Pinterest to see what I'm up to.

Tuesday, August 25, 2020

Rainbow Fairy Slimline Card

Hello everyone! Today I’m sharing a fun rainbow themed fairy slimline card using some new Hello Bluebird stamps and dies.
To create my card I started off by stamping four of the fairies from the new Fairy Dance stamp set and die cutting them using the Fairy Dance dies. I also used one fairy and a ladybug from the Fairy Garden stamp set and dies. Once my fairies where stamped and die cut, I figured out my layout and then colored each fairy in rainbow order using Copic markers.
Next I used the new Fairy Glade Scene Vertical die and die cutting it using white card stock. I used some distress oxide inks on all of the die cut pieces except for the border. I used mowed lawn on the grass and stems sprinkling them with water and watered down mowed lawn and I used scattered straw and wild honey on one flower, wilted violet on another and wild honey and carved pumpkin on the two other flowers. For the large mushroom, I used  antique linen and brushed corduroy on the stem and some abandoned coral and some regular red ink. I also added some Copic marker to the mushroom stem and to the green stems and purple flower for more detail.
For my background, I blended on some tumbled glass over the whole background and then went around the edges with some salty ocean distress oxide ink then sprinkled water and more salty ocean ink. 
Once my background pieces where done, I used the negative of the Fairy Glade die to adhere in my pieces onto my background popping up the top of my red mushroom with foam tape. Next I added my fairies with foam tape and adhered the bee, butterfly, flowers and ladybug. I added some sequins to my background and some Wink of Stella clear glitter pen to all of the fairy wings and butterfly and bee wings.

Friday, August 21, 2020

Party on the Farm

Hello there! I’m popping in today to share a fun birthday card I created using the Hello Bluebird stamp set, Party on the Farm.
To create my card, I started out by stamping several of the cute farm animals and party images from the Party on the Farm set and then die cutting them out using the Party on the Farm dies. Next I used the fun Farmland Background stamp and stamped that onto a standard sized card front. 
Once I had everything stamped and die cut, I used some tumbled glass distress oxide ink along the top of my Farmland Background and some twisted citron and mowed lawn along the bottom. Next I covered the top portion of my background with scrap paper and sprinkled on some water droplets and some watered down mowed lawn distress ink for my grass area. I colored the remainder of my background with Copic markers as well as all of the farm animals, balloon, banner and fence. 
In the close up picture above, you can see that I used a craft knife and cut a little slit around the pigs arm to make it look like he was actually holding the cupcake. That and you can see that I popped up the three main farm animals with foam tape and stamped my happy birthday onto a white banner.

Wednesday, August 19, 2020

You Octopi My Thoughts - CTD607

Hello, hello!  There's a brand new Color Throwdown Challenge that starts to and we have some fun new colors to create with.
For my card I used the fun new Lawn Fawn stamp set Ocean Shell-fie along with the Ocean Shell-fie dies. I started out by stamping several of the Ocean Shell-fie images and coloring them with Copic markers and then die cutting them out.
    Next I used a piece of white card stock and a wave stencil and blended on some distress oxide inks using faded jeans, wilted violet and salty ocean. After that I used the Outside In Stitched Rectangle dies to die cut my ink blended panel and added some splatters of water and white acrylic paint. I added a die cut piece of kraft card stock for along the bottom of my ocean using the Stitched Hillside Borders dies and stamped my sentiment onto a banner which I die cut using the Everyday Sentiment Banners die. After that I adhered all of my images, popping up the purple octopus and yellow clam shell with foam tape, and added some dots of Glossy Accents throughout my background and on the bubble images.
For more inspiration, check out the design teams blog links below or you can go to the Color Throwdown blog for details on how to play along and see all of the sample entries in one location.

Amy Rohl
Amy Rysavy
Thanks so much for stopping by!
Don't forget, you can follow me on InstagramTwitter and Pinterest to see what I'm up to.

Thursday, August 13, 2020

Never Stop Dreaming - August 2020 Large Die of the Month

Hello crafty friends! Today I’m sharing a project using Spellbinders August 2020 Large Die of the Month dies, 3D Still Life Easel & Frame and some Jane Davenport art supplies. I decided to create something I could keep at my art table where I draw, paint and do mixed media.
To create my project, I used this months dies and die cut the easel from kraft card stock and used some gold metallic paper for the reinforcement at the top of the easel and also as a fun detail on the paint brushes. Next I die cut the canvas from white card stock and taped that together. 

After that, I used a rectangle Spellbinders die and die cut a piece of watercolor paper and using Jane Davenport’s bright watercolor palette, I watercolored an area of Best Friend pink water color towards the top of my rectangle. Once that was dry, I used Jane’s Horse Hug stamp set and stamped my Never Stop Dreaming sentiment as well as some black confetti dots from her Mad Confetti stamp set. Next I die cut the tubes of paint from silver metallic card stock, the paint caps and paint brushes from black card stock and teal card stock, the palette from kraft card stock and then I die the colors for my palette and the paint colors for the tubes of paint from white watercolor paper and painted them using the bright watercolor palette paints.

Wednesday, August 12, 2020

Thank You for Your Kindness - CTD606

Hello friends! It’s Wednesday and time for this week's Color Throwdown Challenge.
For my card I used the pretty stamps from The Greetery to create a thank you card. I started out by using the Sprinkled with Kindness stamp set and die and die cut several of the watering cans. Next I used my Misti tool and stamped the multi step watering can in speckled egg, cracked pistachio, a bit of brushed corduroy and weathered wood distress oxide inks. After that I used the Budding Beauties Summer stamp set and dies and stamped the peony images in blush blossom (su), melon berry (pti), spring moss and simply chartreuse ink for the leaves. I also used the Petite Eucalyptus stamp set and dies and stamped them in ocean tides (stamping off for the first step and full strength for the second) along with ripe avocado ink for the stems.
Once my watering can and flower/stems were complete, I die cut a piece of white card stock using the Outside In Stitched Rectangle dies and blended on some antique linen distress oxide ink in the center and used a piece of scrap paper as a stencil and blended on some brushed corduroy distress oxide ink. I stamped my sentiment in the upper left corner and adhered my images, popping up the watering can and peonies with foam tape. To finish off my card I added a few iridescent sequins and stamped my envelope.
For more inspiration, check out the design teams blog links below or you can go to the Color Throwdown blog for details on how to play along and see all of the sample entries in one location.

Amy Rohl
Amy Rysavy
Thanks so much for stopping by!
Don't forget, you can follow me on InstagramTwitter and Pinterest to see what I'm up to.

Friday, August 7, 2020

Sprinkled with Kindness Birthday Card

Hello there! Happy Friday! I’m popping in to share another card that I created using the new Sprinkled with Kindness and Budding Beauties Summer stamps and dies by The Greetery.
To create my card, I started out by die cutting the watering can using the Sprinkled with Kindness dies and then using my Misti tool and the Sprinkled with Kindness stamps I stamped my watering can. The watering can in this stamp set is multi layer stamping so that once its stamped you get a watering can with some nice detail. I used pumice stone distress oxide ink for the first and second layer of stamping and then hickory smoke for the final layer of stamping.
Once my watering can was stamped, I die cut three of the hydrangea using the Budding Beauties Summer dies and then stamped the stems in new leaf ink and each hydrangea in different blues and purples. For the lightest hydrangea, I used spring rain and bashful blue (su) ink, for the darker blue hydrangea, I used bashful blue and brocade blue and for the purple I used lavender lace and lovely lilac inks. 
Next I stamped my birthday sentiment onto a banner and used the Outside In Stitched Rectangle dies to die cut a piece of pale blue Gotta Have Gingham paper as well as a strip of purple gingham Doodlebug Design paper. I also die cut a white card stock stitched rectangle which I adhered my watering can with hydrangeas to, popping up the can and the two front hydrangea with foam tape. I adhered all of my piece together and glued on a few iridescent sequins for a touch of sparkle.

Wednesday, August 5, 2020

You’ve Been So Kind - CTD605

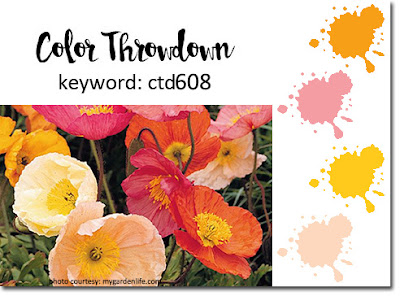
Hello, hello! I hope you’re having a good week so far. It’s time for this week’s Color Throwdown Challenge where we have the fun colors of red, coral and blue to create with and we hope you’ll play along.
 I’ve used this week’s colors and some new stamps by The Greetery that I’ve been excited to create with. I used the Sprinkled with Kindness stamp set and dies along with the new Budding Beauties Summer stamps and dies to create my thank you card.
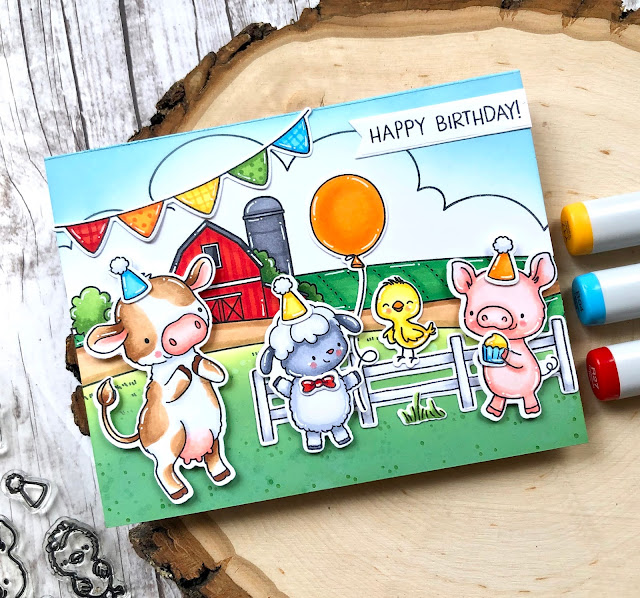
 To create my card, I started out by die cutting a bunch of the watering cans and flowers so I would have several die cut and ready to stamp. Next I stamped two of the hydrangeas one in spring rain and bashful blue and another in bashful blue and brocade blue with new leaf green ink for the stems.

Next I stamped the daisy images in real red, new leaf and harvest gold and the peony image in cameo coral, terra-cotta tile, simply chartreuse and new leaf ink. The watering can was stamped in going gray and basic gray. For my background, I die cut a piece of red gingham Doodlebug Design paper using the Outside In Stitched Rectangle dies and added a strip of blue polka dot Pebbles basic paper along the bottom. On top of that I layered a white scalloped panel which I die cut using the Mix & Mat: Scallops die and stamped my sentiment in the upper left corner. I adhered the red daisies and then popped up the rest of my images with foam tape before adhering them.
For more inspiration, check out the design teams blog links below or you can go to the Color Throwdown blog for details on how to play along and see all of the sample entries in one location.

Amy Rohl
Amy Rysavy
Thanks so much for stopping by!
Don't forget, you can follow me on InstagramTwitter and Pinterest to see what I'm up to.