Showing posts with label Hello Bluebird. Show all posts

Tuesday, October 3, 2023

Peek-A-Boo - Hello Bluebird

Hello, hello! Last Friday was the Hello Bluebird mini fall release and I was excited to be joining the talented design team in creating cards using the adorable new products!
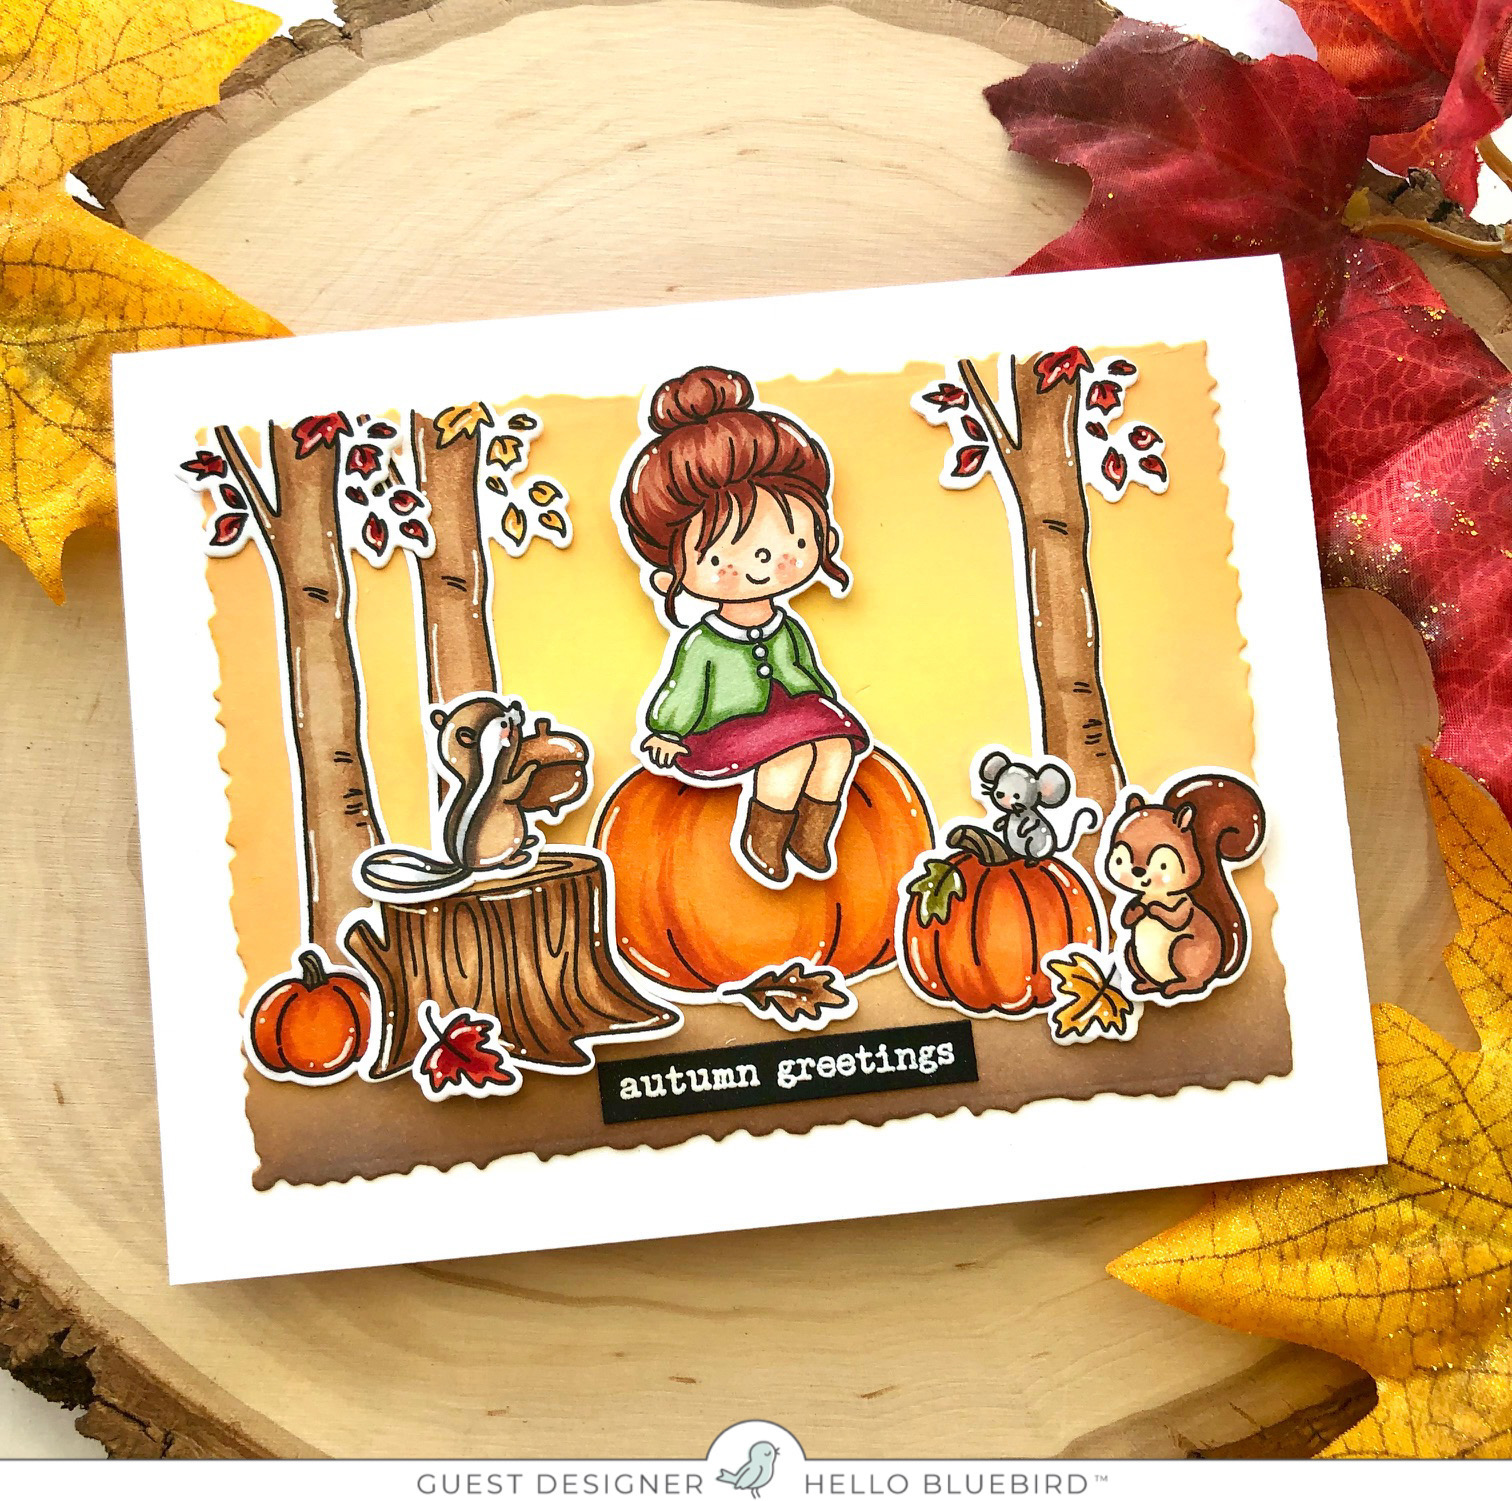
All of my cards were shared over on my Instagram account were I do share more of my cards but today my card features the cute Peek-a-Boo stamp set and dies.
To create my card, I used stamped some of the images from the Peek-a-Boo  set, die cut them out and colored them using copic markers. Next I used the Nesting Deckle dies and die cut a piece of white card stock which I blended with tumbled glass and brushed corduroy distress oxide ink and then added some watered down splatters of vintage photo ink along the bottom.

Once that was done, I stamped my sentiment along the top and added my images popping up the fox and the two small pumpkins using foam tape and adhered my panel to a piece of Doodlebug orange gingham paper.
Thanks so much for stopping by!
Don't forget, you can follow me on InstagramTwitter and Pinterest to see what I'm up to.

Wednesday, July 26, 2023

Beach Babes - CTD753

Good morning! It’s Wednesday and time for this week’s Color Throwdown Challenge where we’ve got some fantastic colors for summer.
Supplies: Hello Bluebird - Beach Babes stamp set and dies, Slimline Ocean Waves Scene die. Copic markers, White gel pen, distress oxide inks - tumbled glass, peacock feathers, brushed corduroy, vintage photo. Foam tape.
For more inspiration, check out the design teams blog links below or you can go to the Color Throwdown blog for details on how to play along and see all of the sample entries in one location.

Amy Rohl
Amy Rysavy
Thanks so much for stopping by!
Don't forget, you can follow me on InstagramTwitter and Pinterest to see what I'm up to.

Wednesday, March 29, 2023

Bouquet Buddies - CTD736

Hello there! It’s Wednesday and time for this week’s Color Throwdown Challenge where we have some cheerful spring colors to create with!
Products used to create my card: Bouquet Buddies Hello Bluebird stamp set and dies, copic markers, white gel pen, SU ink pads: certainly celery, barely banana, daffodil delight, mango melody, Doodlebug yellow gingham paper, Outside in Stitched rectangle dies, foam tape.
For more inspiration, check out the design teams blog links below or you can go to the Color Throwdown blog for details on how to play along and see all of the sample entries in one location.

Amy Rohl
Amy Rysavy
Thanks so much for stopping by!
Don't forget, you can follow me on InstagramTwitter and Pinterest to see what I'm up to.

Wednesday, December 14, 2022

Snowman Competition - CTD723

Hello! Happy Holidays! I hope you’re enjoying the season! Today is Wednesday and time for a new Color Throwdown Challenge, this is our last challenge for this year until the new year.
The colors for this week’s challenge are blue, pink and gold (I went with yellow gold) and created a slimline Christmas card. I used the Hello Bluebird stamp set (which is one of my favorites from the last release), Snowman Competition along with the coordinating dies.
The supplies I used to create my card are straight forward, I stamped and die cut the images from the Snowman Competition set, colored them with copic markers and added white gel pen highlights. For the background I blended on some tumbled glass and broken china distress oxide ink and stamped the snowflakes from the set. 
I stamped my sentiment along the bottom, added my images popping up the two outside critters and the stacked squirrel and bunny with foam tape and then added some white die cut snowflakes and some glitter along the bottom.
For more inspiration, check out the design teams blog links below or you can go to the Color Throwdown blog for details on how to play along and see all of the sample entries in one location.

Amy Rohl
Amy Rysavy
Thanks so much for stopping by!
Don't forget, you can follow me on InstagramTwitter and Pinterest to see what I'm up to.

Friday, November 4, 2022

Hello Bluebird Stamps - Do the Gobble

Hi there, crafty friends! Today I have a fall slimline card that features the new Hello Bluebird stamp set Do the Gobble. I get a kick out of these dancing critters with all of the fall/Thanksgiving images, they're all so cute!
Creating my card was pretty straightforward, I started out by stamping my images then die cutting them using the coordinating dies to the Do the Gobble set and then coloring using copic markers. Next I used the Gallery Frame #5 and die cut just the frame with three windows in orange card stock.
I used a piece of white card stock as my background and blended on some tumbled glass and brushed corduroy distress oxide ink and then stamped my sentiment. After that I glued on my die cut frame and adhered it to my card base which I had covered with a piece of orange polka dot paper and then added my images popping up the animals and the fruit basket with foam tape.

Tuesday, November 1, 2022

Hello Bluebird Stamps - Friendsgiving

Hello there! I’m popping in today to share my latest card featuring the new Hello Bluebird stamp set, Friendsgiving along with the coordinating Friendsgiving dies. These characters are so adorable and perfect for Thanksgiving and fall cards and projects!
To create my Friendsgiving card, I used the North Fork Slimline Scene die where I eliminated the front bottom pieces after I used it to die cut a piece of white card stock. So instead of a water scene, I created ground with woods in the background. Once all of my pieces where die cut, I used pine needles distress oxide ink on the pines, mowed lawn on the grassy hills and tumbled glass for sky and brushed corduroy and walnut stain on the ground. I also used a light brown copic marker on the birch trees and a green on the pines.
Once my background was finished, I used my Misti and stamped my sentiment from the set. After that I colored the images that I had stamped and die cut using copic markers, added some white gel pen highlights and adhered them to my slimline card base. I should also mention that the tree stump image is from the Bonfire Buddies stamp set from the last release.

Friday, October 28, 2022

Dear Santa

Hello there! Today I’m sharing a card featuring the new Hello Bluebird stamp set, Dear Santa along with the Winter Birch Scene die.
The Dear Santa stamp set is such a cute set that can be used for more than just Christmas, it could be used for Valentine’s Day or for sending a thinking of you card.
For my card, I stamped the images from the set, die cut them using the coordinating dies and then colored them using copic markers. Once that was done I used the Winter Birch Scene die and die cut it from white card stock. For my background, I blended on some tumbled glass distress oxide ink onto a white card base then glued on my die cut pieces. After that I stamped my sentiment and adhered my images popping up the stacked critters with foam tape. Before I taped the mailbox down, I used a craft knife and cut a slit near the flag and tucked in the holly image. I die cut some snowflakes using the Frosty Flakes dies and added three to my scene along with some glitter which I added to the top of the snowy mailbox, the base and ground.

Sunday, October 23, 2022

Hello Bluebird Release Day!

Today’s the day! Tonight, October 23rd at 7pm MST the new Hello Bluebird holiday release will be available for purchase! My card today features the sweet, Snowman Hugs stamp set and dies along with the new Warm Hugs Word Die.
To create my card, I stamped and die cut my image from the new Snowman Hugs set and then colored it using copic markers. Next I used the new Warm Hugs Word Die and die cut it twice using white card stock and then once more using pink polka dot paper and then glued all of them 
together to add dimension to the die cut words. After that I used the Nesting Deckle dies to die cut a piece of white card stock which I then blended with spun sugar distress oxide ink. Before adhering my image and die cut word, I used the Frosty Flakes dies with white card stock and added some snowflakes along with some glitter.

Saturday, October 22, 2022

Hello Bluebird Release Sneak Peek - Day 2

It’s Day 2 of the Hello Bluebird Sneak Peeks of the October release and I’m here today with a group of tags that I created featuring the adorable new Merry Makers stamp set and dies which will be available October 23rd at 7pm MST.
The new Merry Makers stamp set is perfect for creating either Christmas tags or adorable card scenes! To create my Christmas tags, I stamped all of the images from the set, die cut them and then colored them using copic markers. 
I used the Nesting Square dies and die cut white card stock squares as well as red, teal and green. Next I blended on some tumbled glass distress oxide ink along the tops of each white square, stamped my sentiments and then added white snowdrifts that I die cut using the new Snowy Countryside Square Scene die. I adhered my images using foam tape and added some snowflakes that I had die cut using the Frosty Flakes Dies.
I punched holes in the tops of each tag and threaded on some red and white bakers twine and added some glitter to all of the snowflakes and they were done.


Friday, October 21, 2022

Hello Bluebird Release Sneak Peek - Day 1

Hello, crafty friends! I’m excited and honored to be guest designing with Hello Bluebird again for their holiday release! This release is filled with adorable stamp sets and dies for fall, thanksgiving, Christmas and winter and I can’t for you to see it! The new release will be available over on the Hello Bluebird site on October 23rd at 7pm MST.
Today I’m sharing a card that features the new Autumn Days stamp set and dies. This is such a sweet fall set with not only two girl images but cute critters and elements to create a fun autumn scene.
To create my card I started out by stamping my images, then used the coordinating dies to die cut them out, then colored them using copic markers. Next I used the Nesting Deckle dies and die cut a piece of white card stock which I ink blended scattered straw, wild honey and vintage photo distress oxide ink on. Once that was done, I adhered my images and created my scene popping up the girl, chipmunk and squirrel with foam tape. I heat embossed my sentiment on black card stock using white embossing powder and added my sentiment below the images.