Showing posts with label Spring/Easter. Show all posts

Thursday, March 23, 2023

Easter Wishes


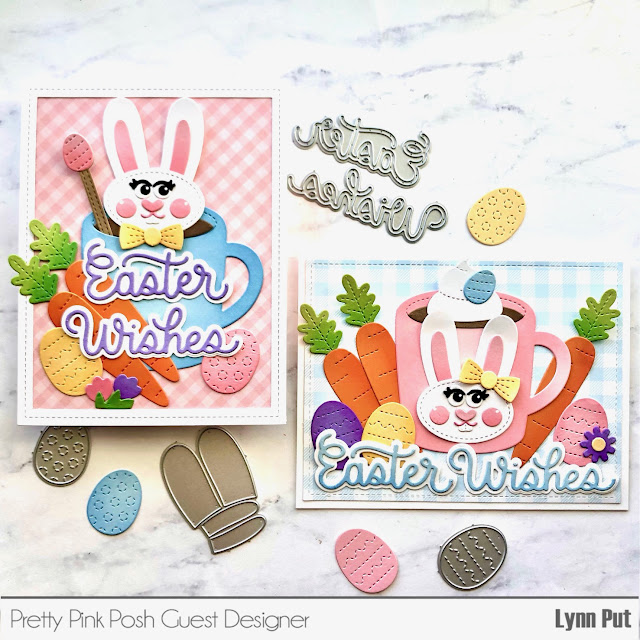
Hi there! I’m sharing another Easter card that I created using the Easter Mug Additions from this month’s release from Pretty Pink Posh.
To create my card I used the original Winter Mug dies and die cut the mug from white card stock and then blended on some worn lipstick distress oxide ink around the edges and added coffee inside the mug from brown card stock.
I used the fun accessory dies to create a face and ears for my mug and added the bow tie and stir stick. I die cut the carrots and Easter eggs and blended on some distress inks to give them dimension and used the Easter Wishes Shadow dies for my sentiment.

Monday, March 20, 2023

Easter Mug Additions

Good morning! Today I have the first two cards I created from the Pretty Pink Posh release this month. Both cards feature the Easter Mug Addition dies and the Easter Wishes Shadow dies. In honesty after I first made these cards I realized that I used the dies in what I thought was the wrong way but after sending the pictures of my cards to Paulina, the owner of the Pretty Pink Posh she said she liked them and that it showed how to use the dies in a different way. So here they are!
Both of my cards use the same products but different layouts and background papers. I used the Winter Mug dies and die cut two mugs, one in pale blue and one in pale pink card stock. To give them some dimension I used some distress oxide inks in worn lipstick and broken china along the edges.
Next I die cut a bunch of the Easter eggs in pastel colors and the carrots and blended on some distress oxide ink on those as well using mustard seed, worn lipstick and wilted violet. I used the oval from the die set along with the bunny ears and die cut them from white card stock and used the accent dies to create faces for each of the rabbits.
I used the Easter Wishes Shadow dies and die cut one set from lavender card stock and another from pale blue and added them to each layout.

Tuesday, March 14, 2023

Spring Chicks Card Set - Pretty Pink Posh

Hi there! I’m back with more cards using products from this month’s Pretty Pink Posh release and today I have a card set that features the adorable new Spring Chicks stamp set.
Even though the new Spring Chicks stamp set would be adorable to create a whole scene using several of the chicks or to create spring gift tags, I decided to create individual square cards I could send.
These were simple and fun to create. I started out by stamping and die cutting a bunch of these cute images and then coloring them using copic markers. Next I die cut three stitched squares and blended on some tumbled glass and mowed lawn distress oxide ink. After that I used the little raindrop stamp from the set and stamped it along the top of each square and stamped my sentiments. Once that was done, I added my images, popping up each chick with foam tape. For my backgrounds, I used pastel colored card stock and the new Layered Umbrellas Stencil with coordinating ink to go with my card stock.

Sunday, March 12, 2023

Spring Jar - Pretty Pink Posh

Hello there! Today I’m sharing another card that I created using products from this month’s Pretty Pink Posh spring release. 
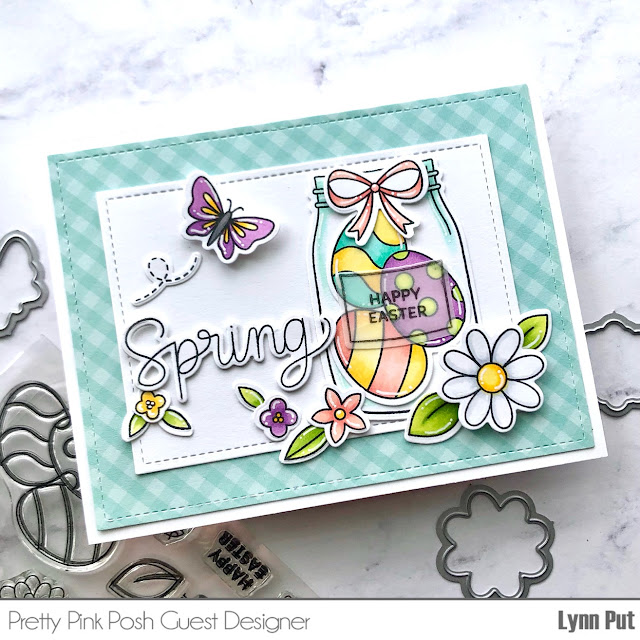
I used the new Spring Jar stamp set and coordinating Spring Jar dies to create an Easter card. To create my card, I started out by stamping and die cutting all of my images then coloring them using copic markers. I adhered the egg image inside the jar and then stamped the label and Easter sentiment onto vellum and die cut it out. 
For my Spring sentiment, I used the Leafy Spring Wreath stamp set and dies and die cut two extra of the spring word and glued them together for added dimension. I added my images onto a white stitched rectangle and then adhered it onto a piece of aqua gingham paper. The large daisy and the butterfly were both adhered using foam tape.


Thursday, March 9, 2023

Pretty Pink Posh March Release Blog Hop!

Hello, crafty friends! I’m excited to be a Pretty Pink Posh guest designer for the month of March and to be participating in this month’s Spring release blog hop! There are so many wonderful new Spring/Easter products with this month’s Pretty Pink Posh release, from stamp sets to dies and more!
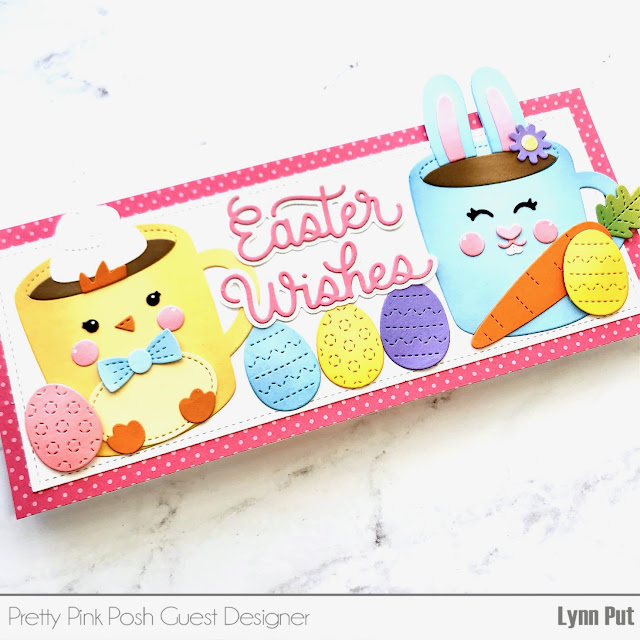
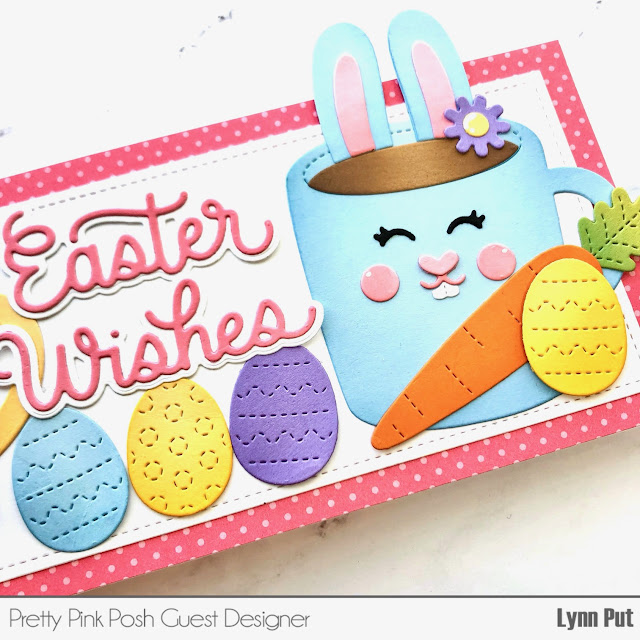
The card I’m sharing today is a slimline Easter card that features the adorable new Easter Mug Additions dies which work with the Winter Mug dies set.
To create my card, I used the Winter Mug die set and die cut two mugs, one in pale yellow and one in pale blue. I used mustard seed and broken china distress oxide ink to blend around the edges of each mug to give it some dimension and then used the Easter Mug Addition dies with all of the fun accessories to add details to the mugs to make one into a chick and another a bunny.
From the Easter Mug Additions dies I used also die cut a bunch of the eggs in pastel colors and a carrot to help create my scene. For my sentiment I used the new Easter Wishes Shadow dies and die cut the words from pink and white card stock. Once all of my die cut pieces where adhered, I added my white panel to a piece of pink and white polka dot paper.
Below you can see several different ideas as to how you can use the new Easter Mug Additions dies to create fun Easter/Spring cards.
Be sure to hop along to the blogs below for a chance to win a $25 gift certificate! Winners with be picked randomly along the blog hop. Comments must be left by 11:59 PM PST on 3/14/23 and the winners will be announced on the Pretty Pink Posh blog.


Wednesday, April 8, 2020

Happy Easter - CTD588

Hello! I hope you and your loved ones are well and holding up during this time of pandemic. It still feels like something from a crazy nightmare. Our family has been staying home other than trips to the grocery store or a few trips that I’ve made to drop off groceries to my mom. Crafting, reading and long walks help to keep my spirits up, I hope you have something you enjoy doing that helps you as well. Stay safe friendsAnd since I want to keep my blog a happy place with colorful cards and cheerful messages let's get to my card.
I’m hostess over at the Color Throwdown Challenge blog this week and I’ve chosen some happy spring colors for all of us to create with. I can’t wait to see what everyone creates!
 Since the inspiration photo I chose for this week’s Color Throwdown Challenge has a spring feel to it, I decided to create a spring themed Easter card. I used several different Lawn Fawn stamp sets to make a slimline card. I started out using the How You Bean stamp set and How You Bean dies and stamped out the jar, lid, group of jelly beans and several individual jelly beans and color them using Copic markers then die cut them out. 
 Next I used the Rub-A-Dub-Dub stamp set and Rub-A-Dub-Dub dies with all of the cute ducks and I stamped, colored and die cut the duck images. I thought it would be fun to have one of the little ducks inside the jar reaching up to pop another jelly bean outside the jar so I added an extra green jelly bean for him to stand on and stamped the lines of the jar onto a yellow jelly bean just above the ducks nose so it would look like the yellow jelly bean was inside the jar. And to give the jar a shiny look (see above photo), I die cut a piece of clear packaging using the jar die and tacked it in place when I adhered the lid and flowers. 
 For my card base, I used a cloud stencil and blended on some tumbled glass distress oxide ink. For the grass, I used the Grassy Hillside Borders die and die cut a piece of new leaf card stock then blended on some lucky clover distress oxide ink. To complete my spring scene, I used flowers and stems from the Oh Gnome and Oh Gnome dies as well as the Fairy Friends and Fairy Friends dies. The little Easter eggs are from the Hoppy Easter set and dies and for my sentiment, I used the Happy, Happy, Happy set and dies and the Happy Add-on set for the word Easter which I stamped onto a white banner using the Everyday Sentiment Banners die. For dimension, I used foam tape to pop up three of the ducks and some of the jelly beans.
For more inspiration, check out the design teams blog links below or you can go to the Color Throwdown blog for details on how to play along and see all of the sample entries in one location.

Amy Rohl
Amy Rysavy
Thanks so much for stopping by!
Don't forget, you can follow me on InstagramTwitter and Pinterest to see what I'm up to.

Monday, March 30, 2020

Frilly Frames - Eyelet Lace Easter Card

 Hi there! I’m up over on the Sunny Studio Stamps blog today sharing a fun Easter card I created featuring the new Frilly Frames - Eyelet Lace.
To create my card, I not only used the Frilly Frames - Eyelet Lace die with it’s dainty scalloped edges but I also used the sweet Chickie Baby stamp set and Chickie Baby dies to create an Easter scene.
 To create my card I started out with a white card base then used just the outer portion of the Frilly Frames - Eyelet Lace die and die cut a piece of lavender lace card stock. Next I die cut a stitched rectangle and blended on some tumbled glass distress oxide ink along the top half of it. After that I used a piece of the grass paper from the Spring Fling paper and die cut it using the grass die from the  Sunny Sentiments dies. Once that was done, I stamped my happy  Easter sentiment and some of the adorable images from the Chickie Baby stamp set. I colored my images with Copic markers and die cut them out. To complete my scene, I used a few images from the Spring Showers stamp set and Spring Showers dies including the clouds, tulip flowers and butterfly.

Monday, March 23, 2020

Blooming Frame

Hi there! I’m up over on the Sunny Studio Stamps blog today sharing a floral Easter card I created featuring the pretty new Blooming Frame die.
The detail in the Blooming Frame die is beautiful and can be used in so many different ways to create a new look each time. For my card I wanted to create an Easter card and I wanted to use the Happy Easter sentiment from the Chickie Baby stamp set which I thought would look nice stamped in a die cut circle so even though the Blooming Frames die, once it’s die cut, leaves a rectangle of card stock in the center I decided to camouflage that with the flowers from the Cheerful Daisies stamp set.
 To create my card, I started out with a white card base than added a panel of pale blue card stock. Next I used the Blooming Frame die and die cut it from a piece of white card stock and adhered it to my card front. After that I stamped my Happy Easter sentiment onto a white die cut circle and added that in the center of my card. Once that was done, I used the Cheerful Daisies dies to die cut several of the daisies from the Cheerful Daisies stamp set and stamped them in daffodil delight, summer sun, pumpkin pie, hibiscus burst, raspberry fizz ink and limeade ice and new leaf ink for the leaves. I added all of my stamped flowers and leaves around my circle sentiment popping up the largest yellow daisy with foam tape. To add a little sparkle, I glued on a few of the Iridescent Pastel Confetti.
Thanks so much for stopping by and have a great day!

Monday, March 16, 2020

Happy Spring

 Hello! Happy Monday! Today I’m up over on the Sunny Studio Stamps blog where I’m sharing a card that I created featuring the Cheerful Daisies stamp set and dies.
 To create my Cheerful Daisies card, I started out by die cutting a bunch of the daisies and leaves from white card stock using the Cheerful Daisies dies. After that I used hibiscus burst and raspberry fizz inks to stamp the daisies and daffodil delight and summer sun ink for the center of the daisies. The leaves were stamped in limeade ice and new leaf inks. The amount of detail in these stamps is fantastic and with each layer of stamping the daisies and leaves look realistic.
 Once I had my daisies and leaves stamped, I worked on my background. I used Frilly Frames Lattice die with some white card stock for the first layer of my background. Then I die cut a rectangle of white card stock and blended on some spiced marmalade and picked raspberry distress oxide ink. Once that was done I added some splatters of water and blotted them up with paper towel. Next I heat embossing my Happy Spring sentiment with white embossing powder and adhered my ink blended rectangle to the Frilly Frames Lattice piece and then onto my card front. After that I adhered all of my daisies, popping up one of the larger daisies with foam tape. For a finishing touch, I stamped three little bees from the Sunny Sentiments stamp set and dies and colored them using Copic markers and added some yellow glitter to the centers of the daisies.
Thank you for your visit! 

Monday, March 9, 2020

Chickie Baby

Hello there! Today I’m up over on the Sunny Studio Stamps blog sharing an Easter card I created featuring the adorable new stamp set Chickie Baby.
To create my card, I started out by stamping a bunch of the adorable chick images, flowers and eggs from the Chickie Baby stamp set and then coloring them using Copic markers and die cutting them out using the Chickie Baby dies. Next I die cut a circle of lavender cardstock and heat embossed the Happy Easter sentiment that comes with the set in white embossing powder. For my background I used a piece of tulip paper from the Spring Fling paper cardstock papers and for along the bottom of my card I used the Sunny Sentiments dies and some green cardstock for the grass. After that I added my lavender circle with my sentiment and adhered my chicks popping up three of the chicks and the bottom portion of the cracked egg using foam tape.