Monday, April 27, 2020

Grad Cat

Hello there! I’m up over on the Sunny Studio Stamps blog today sharing a fun graduation card I created featuring the cute new Grad Cat stamp set and dies.
To create my graduation card, I started out by stamping the adorable cat image along with four of the book images from the Grad Cat set and colored them using Copic markers then die cutting them out using the Grad Cat dies.

Next I used the Frilly Frames-Herringbone dies and used just the stitched outside portion of the die to die cut a piece of brilliant blue Classic Gingham paper and also a piece of white card stock for my background. I also added a strip of black card stock along the bottom of my background. After that I die cut a piece of white card stock using the Stitched Arch dies and stamped my sentiment along the bottom and adhered my images popping up the cat and books with foam tape. I stamped three little stars from the set around the cat and colored them with Copic markers then I adhered my white arch piece to my card front to complete my card.

Saturday, April 25, 2020

Spellbinders - Jane Davenport Collection

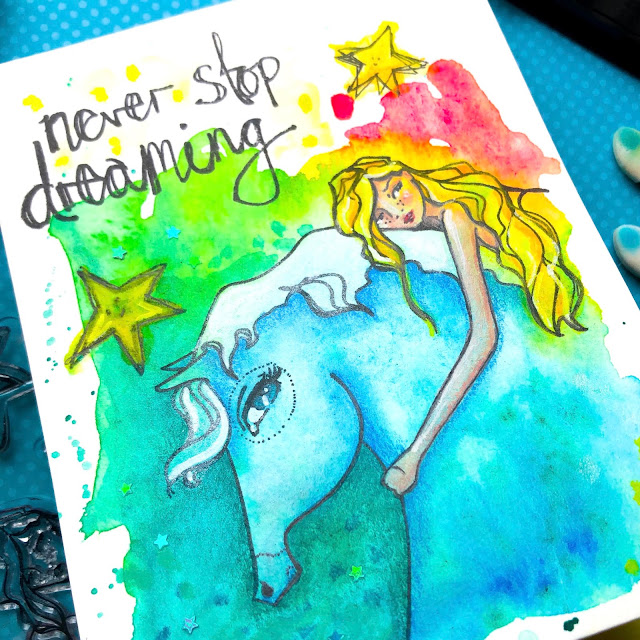
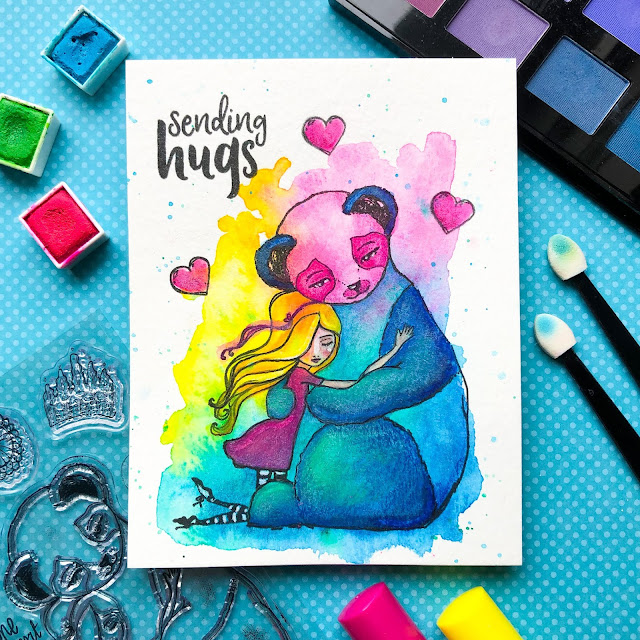
 Hello crafty friends! Today I’m popping in to share a few colorful mixed media cards that I had fun creating using two new stamp sets by Spellbinders and designed by Jane Davenport.
 For my first card, I used the new Horse Hug stamp set. I started out by using a panel of watercolor paper and added some watercolor using the Jane Davenport Brights watercolor set. Once that was completely dry, I stamped my images and sentiment from the set.

After that I had fun using both the Chilled and Birthday Suit Palette Pastels to give my images some contour. I also used some AquaPastels for the girls hair and the stars and used some Magic Wand colored pencils on the girl, horse and around the background of the horses head. To add a little shimmer I used some of the white Mineral Eyes Palette Pastels on the horses mane, some dots of it on the background and added some tiny iridescent stars.
 For my second card, I used the Panda Thank You stamp set for the images and used the Horse Hug set for my sentiment. Again I used the Brights watercolor set on watercolor paper and kept my colors less watered down. I love the intensity of these watercolors! After that I stamped my images and sentiment and used the same supplies listed above for my first card to make the images pop. 

Wednesday, April 22, 2020

Hello Friend - CTD590

Hello there! It’s time for this week’s Color Throwdown and we have some great new colors to create with.
For my card I used the Papertrey Ink stamp set Flower Power along with the coordinating Flower Power dies. I used the the colors pacific point, summer sun, bashful blue, chocolate chip and new leaf inks to stamp my images and kept my card clean and simple. I also used a piece of knock on wood paper for along the bottom of my card to ground my vase. To add a touch of sparkle, I used some cinnamon Stickles in center of each sunflower.
For more inspiration, check out the design teams blog links below or you can go to the Color Throwdown blog for details on how to play along and see all of the sample entries in one location.

Amy Rohl
Amy Rysavy
Thanks so much for stopping by!
Don't forget, you can follow me on InstagramTwitter and Pinterest to see what I'm up to.

Wednesday, April 15, 2020

Moose and Friends - CTD589

Hello! It’s time for this week’s Color Throwdown Challenge and we hope you’ll play along.
For my card I used the Hello Bluebird stamp set Moose and Friends along with the coordinating Moose and Friends dies to create a birthday card. I started out by stamping the cute skunks and some of the images from the set and coloring them using Copic markers then die cutting them out. Next I blended on some tumbled glass distress oxide ink onto a panel of white card stock using a cloud stencil. After that I die cut a piece of white card stock using the Gallery Frame Die #3 and adhered a strip of red striped Doodlebug paper from the backside of the frame. I stamped the word happy from the Fall Friends stamp set and using the Happy Birthday Words die I die cut two from black card stock and glued them together. I added my images, popping up the two skunks and one balloon with foam tape.
For more inspiration, check out the design teams blog links below or you can go to the Color Throwdown blog for details on how to play along and see all of the sample entries in one location.

Amy Rohl
Amy Rysavy
Thanks so much for stopping by!
Don't forget, you can follow me on InstagramTwitter and Pinterest to see what I'm up to.

Monday, April 13, 2020

Have a Magical Birthday

 Hello there! I’m up over on the Sunny Studio Stamps blog today sharing a colorful birthday card I created featuring the fun Prancing Pegasus stamp set and dies.
 When creating my card, I went with a clean and simple rainbow theme using the fun Prancing Pegasus stamp set and Prancing Pegasus dies. I started out by stamping the Pegasus image from the set and coloring it using Copic markers then die cutting it out. Next I used the Sunny Sentiments stamp set and stamped three of the cloud images and three star images, I colored them and used the coordinating Sunny Sentiment dies to die cut them out.

Once that was done, I heat embossed with white embossing powder on black card stock the word Magical and used my Misti tool to stamp the rest of my sentiment on to my white card base. Next I used a rainbow of distress oxide ink colors and blended them on to a strip of white card stock. I used candied apple, carved pumpkin, twisted citron, salty ocean and wilted violet. I adhered my rainbow strip to my card front and added my images, popping up the Pegasus with foam tape.
Thanks so much for stopping by!

Thursday, April 9, 2020

Spellbinders Large Die of the Month

 Hello! Today I’m popping in to share a fun masculine card I created using this month’s Large Die of the Month dies from Spellbinders. There was a large assortment of dies in this month’s kit but I decided since I don’t have very many masculine cards in my stash to go with the sports dies.
 To create my card, I die cut the pieces for the basketball, soccer ball, football and baseball from card stock. Next I blended on some distress oxide ink on the football (walnut stain), basketball (candied apple) and bat (frayed burlap) and glued my die cut pieces together. After that I die cut the sentiment block from white card stock and the backing from black card stock and glued them together.

For my layout, I used a piece of black card stock, then added a horizontal strip of red card stock toward the bottom. I cut primary colored striped papers which I cut down to 1 3/4” squares and matted in white and adhered my sentiment block and added a few enamel dots.

Wednesday, April 8, 2020

Happy Easter - CTD588

Hello! I hope you and your loved ones are well and holding up during this time of pandemic. It still feels like something from a crazy nightmare. Our family has been staying home other than trips to the grocery store or a few trips that I’ve made to drop off groceries to my mom. Crafting, reading and long walks help to keep my spirits up, I hope you have something you enjoy doing that helps you as well. Stay safe friendsAnd since I want to keep my blog a happy place with colorful cards and cheerful messages let's get to my card.
I’m hostess over at the Color Throwdown Challenge blog this week and I’ve chosen some happy spring colors for all of us to create with. I can’t wait to see what everyone creates!
 Since the inspiration photo I chose for this week’s Color Throwdown Challenge has a spring feel to it, I decided to create a spring themed Easter card. I used several different Lawn Fawn stamp sets to make a slimline card. I started out using the How You Bean stamp set and How You Bean dies and stamped out the jar, lid, group of jelly beans and several individual jelly beans and color them using Copic markers then die cut them out. 
 Next I used the Rub-A-Dub-Dub stamp set and Rub-A-Dub-Dub dies with all of the cute ducks and I stamped, colored and die cut the duck images. I thought it would be fun to have one of the little ducks inside the jar reaching up to pop another jelly bean outside the jar so I added an extra green jelly bean for him to stand on and stamped the lines of the jar onto a yellow jelly bean just above the ducks nose so it would look like the yellow jelly bean was inside the jar. And to give the jar a shiny look (see above photo), I die cut a piece of clear packaging using the jar die and tacked it in place when I adhered the lid and flowers. 
 For my card base, I used a cloud stencil and blended on some tumbled glass distress oxide ink. For the grass, I used the Grassy Hillside Borders die and die cut a piece of new leaf card stock then blended on some lucky clover distress oxide ink. To complete my spring scene, I used flowers and stems from the Oh Gnome and Oh Gnome dies as well as the Fairy Friends and Fairy Friends dies. The little Easter eggs are from the Hoppy Easter set and dies and for my sentiment, I used the Happy, Happy, Happy set and dies and the Happy Add-on set for the word Easter which I stamped onto a white banner using the Everyday Sentiment Banners die. For dimension, I used foam tape to pop up three of the ducks and some of the jelly beans.
For more inspiration, check out the design teams blog links below or you can go to the Color Throwdown blog for details on how to play along and see all of the sample entries in one location.

Amy Rohl
Amy Rysavy
Thanks so much for stopping by!
Don't forget, you can follow me on InstagramTwitter and Pinterest to see what I'm up to.

Monday, April 6, 2020

Pink Peonies - Best Wishes

Good morning! I’m up over on the Sunny Studio Stamps blog today sharing a birthday card I created featuring the beautiful stamp set Pink Peonies.
To create my card, I started out by stamping three of the peonies and some of the leaves from the Pink Peonies stamp set and colored them using Copic markers then die cut them out using the Pink Peonies dies. Next I die cut a piece of white card stock using the Frilly Frames - Eyelet Lace die. After that I die cut a stitched rectangle and blended on three different colors of distress oxide ink, at one end I used twisted citron then blended on some fossilized amber in the middle and blended it out toward the other end for a lighter yellow. I then went back and blended on some mowed lawn along the edges of the twisted citron end. 
Once my ink blending was completed, I used my Misti tool and stamped my sentiment. After that I watered down some black acrylic paint and added some paint splatters, once that was dry I adhered my blended ink piece to my card front and adhered my peonies and leaf images, popping up the large center peony with foam tape. I also added some foam tape on the backside of my white die cut Frilly Frames - Eyelet Lace piece.

Wednesday, April 1, 2020

Sending Wishes.. - CTD587

Hello there! It’s Wednesday and time for this week’s Color Throwdown Challenge.
 For my card I used the new Lawn Fawn stamp set Dandy Day along with the coordinating Dandy Day dies. I started out by stamping several of the images from the Dandy Day set and coloring them using Copic markers then die cutting them out. I used a white card base, then added a panel of pink Doodlebug Designs paper that I die cut using the Outside In Stitched Rectangle dies. Next I die cut a square of white card stock using the Small Stitched Square Stackables dies and using a cloud stencil I blended on some tumbled glass distress oxide ink for a sky. After that I used the Grassy Hillside Borders die and blended on some mowed lawn distress oxide ink around the edges and attached it to my square. Once that was done, I adhered my images, these mice are adorable, I popped up all three of the mice with foam tape as well as adding foam tape to the back of my square. The two sentiments were stamped onto die cut Simple Wavy Banners. I added some Diamond Stickles to all of the dandelions and the dandelion fluff.
For more inspiration, check out the design teams blog links below or you can go to the Color Throwdown blog for details on how to play along and see all of the sample entries in one location.

Amy Rohl
Amy Rysavy
Thanks so much for stopping by!
Don't forget, you can follow me on InstagramTwitter and Pinterest to see what I'm up to.