Wednesday, January 31, 2018

Flora & Fauna - (CTD478)

Hello!  It’s my turn as hostess for this week’s Color Throwdown Challenge and I chose a colorful cozy inspiration photo with the bright color of hot pink, lime green, yellow and pale blue.  I’m looking forward to see what everyone creates!
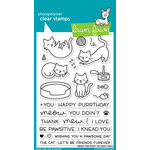
 I created two cards for the challenge this week using a mix of Flora & Fauna stamps.  For my first card, I used the tea cup, the hello sentiment and a few stem images from the Owl Always Love You set and I also stamped flowers and stems and a butterfly from the Oh Hello Friend, Butterfly Jar and Aviary Love sets.  I did a lot of masking creating my card, stamping the tea cup first then masking it off to add the flowers and stems and then watercolored all of my images.  As a final touch, I added some pink rhinestones and stamped some tiny pink hearts.
 For my second card, I went with a clean and simple look and stamped the snail from the Aviary Love set on top of the mushroom from the Owl Always Love You set and then stamped the bottle/terrarium and a mix of stems from all of the sets I mention above.  I watercolored my images, added foam tape and adhered my panel to a piece of limeade ice cardstock which I had randomly stamped using the stem images.
For more inspiration, check out the design teams' blog links below OR you can go to the Color Throwdown blog for details on how to play along and you can see all the sample entries in one location.

Amy Rohl
Amy Rysavy
Wanda Cullen
Debra James - December Guest Designer


Thanks so much for stopping by!
Don't forget, you can follow me on InstagramTwitter and Pinterest to see what I'm up to.

Wednesday, January 24, 2018

Hello Meow You Doin? - (CTD477)

Hello, meow you doin? lol. Happy Wednesday, we made it half way through the week!  I’m popping in today to share my card for this week’s Color Throwdown Challenge.
For my card, I used the Lawn Fawn stamp set Meow You Doin’? along with the Meow You Doin’? dies to create a thinking of you card. (Am I the only one who thinks of Joey from the sitcom Friends when I read the Meow You Doin? line? I hope not.)  This card was pretty straightforward, other then stamping the cute cat images and coloring them with Copic markers then die cutting them out, the rest was easy.  I used a white card base, then added a panel of polka dot hawaiian shores which I die cut using the Outside In Stitched Rectangle Stackables and a strip of Doodlebug Designs orange gingham paper.  Next I die cut a white cardstock rectangle using the same dies as above and stamped my sentiment and added my die cut hello which I die cut three times from orange zest using the Scripty Hello die.  After that I tied on some orange bakers twine, popped up my center sentiment panel and added my cats.
For more inspiration, check out the design teams' blog links below OR you can go to the Color Throwdown blog for details on how to play along and you can see all the sample entries in one location.

Amy Rohl
Amy Rysavy
Wanda Cullen
Debra James - December/January Guest Designer

Saturday, January 20, 2018

Swinging by to say....HAPPY VALENTINE’S DAY

 Happy Saturday!  Today I’m popping in to share a fun Valentine’s Day card I made using some Lawn Fawn supplies.
 I used the Lawn Fawn stamp and die bundle Love Ya Bunches. I thought these cute monkey images would make for a fun Valentine combined with the Happy, Happy, Happy Add On set.  I was inspired by the current Lawn Fawnatics Challenge after seeing the hanging hearts from the inspiration photo.  I started out by die cutting a piece of watercolor paper using the Outside In Stitched Rectangle Stackables die and added some green and teal watercolor along the top and aqua throughout the rest. Once it was dry, I added some aqua paint splatters and then stamped the top part of my sentiment along with some jungle leaves which I stamped and touched up with some Copic markers.  After that I stamped my images and colored them with Copic markers, then die cut them out.  I wanted a little bit of a bigger heart then what came in the Love Ya Bunches set so I used the heart from the Elphie Selfie set and stamped them in red ink then die cut them out.  I used the Grassy Hillside Borders die for along the bottom and stamped my Valentine sentiment, then stamped my Happy in Versamark ink and heat embossed in using white embossing powder, then die cut it.  I glued on the vines and added my monkeys using foam tape then added the hearts.  I popped up the whole panel with foam tape and added it to a red cardstock card base.

Wednesday, January 17, 2018

Warm Winter Wishes - (CTD476)

Hi there!  It’s time for this week’s Color Throwdown Challenge.  We’ve got some wonderful wintery colors to create with this week and we hope you’ll play along.
 I went with a clean and simple card for the challenge this week and used the Lawn Fawn stamp set, Love You a Latte and the Love You a Latte dies to create a wintery themed card.  I started out with a white card base, then added a panel of spring rain cardstock that I die cut using Outside In Stitched Rectangle Stackables. Next I used the Mini Snowflakes dies and die cut a bunch to glue on my background. After that, I die cut another rectangle using the same dies as above and stamped my Warm Wishes sentiment and tiny hearts. Then I stamped my hot cocoa cup and saucer onto a piece of white cardstock, die cut them out and colored them using Copic markers.  I adhered the cocoa cup and the top rectangle piece to my card front with foam tape.
For more inspiration, check out the design teams' blog links below OR you can go to the Color Throwdown blog for details on how to play along and you can see all the sample entries in one location.

Amy Rohl
Amy Rysavy
Wanda Cullen
Debra James - December Guest Designer

Sunday, January 14, 2018

Sending my Love Valentines

 Hello!  I hope you’re having a relaxing weekend.  I’m popping in today to share a few Valentine cards I made the other day using some Papertrey Ink supples.  I don’t have a lot of Papertey Ink kits, but the ones I do have I was excited to purchase and happy to own.  Once I received them I made a few cards and then they were tucked away.  This year I told myself that I need to try and use more of the pieces of the few different kits that I own, so I pulled out the Make-it-Market: Don’t Forget to Write kit and used the Sending die along with the stamps and used the heart shaped dies from the Make-it-Market: Shakers & Sprinkles kit to create my Valentines.
I started out with the square scalloped die cut card base from the Don’t Forget to Write kit and added a piece of hibiscus burst polka dot paper.  Next I die cut my heart pieces in white and pure poppy and die cut four of the Sending pieces, gluing them together to make a set of two.  After that I die cut my flower pieces and stamped them in hibiscus burst, pure poppy, lovely lady and new leaf and adhered them to my card.  For the card pictured above, I stamped my sentiment onto a small banner and tucked the end under the die cut flowers then glued on my red sending piece and added red and pink rhinestones and tiny pearls.  For the other card, I stamped my sentiment directly onto the center white heart and added my other pieces and used just pearls (and I see one is missing on the bottom flowers now that I look at these pictures).

Wednesday, January 10, 2018

Bird Collage - (CTD475)

Hello, hello!  I hope you’re doing well today!  Before I get to today’s post, I wanted to say thank you to all of those you left such incredibly sweet comments on my Gran’s Garden Card Collection post for those three days.
Today is Wednesday and time for a new Color Throwdown Challenge!  Our colors for this week’s challenge are Navy, Aqua and Pink.
 For my card today, I used the Flora & Fauna stamp sets, Aviary Love and Oh Hello Friend and stamped a collage of images onto watercolor paper and did some loose watercoloring.  Working with these sets is so fun because so many of the images work together and you can really get creative.  I usually start out by choosing the images I’d like to work with and then stamp them out onto my paper mat I have on my work station that way I can see what might work well.  
For my card, I die cut a piece of watercolor paper using the Inside & Out Stitched Rectangle die and then stamped my images.  I started out stamping the bird image first and then my three main flowers.  I created a mask for the two larger flowers and the bird image by stamping them onto copy paper, cutting them out and adding a bit of repositionable adhesive on the backs.  So after stamping the bird and main flowers, I covered them up with the masks and stamped my leaves, stems, butterfly and remaining images and had fun watercoloring, and by having a mask for the bird and flowers I was also able to add some splatters of paint at the end without getting any on my main images.
For more inspiration, check out the design teams' blog links below OR you can go to the Color Throwdown blog for details on how to play along and you can see all the sample entries in one location.

Amy Rohl
Amy Rysavy
Wanda Cullen
Debra James - January Guest Designer

Monday, January 8, 2018

Gran’s Garden Card Collection Day 3

 Welcome to Day 3 and the final day of my Gran’s Garden Card Collection.  If you’d like to see Day 1 and Day 2, you can click HERE and HERE.
For my first card for today, I used the colors pure poppy, scarlet jewel, winter wisteria, royal velvet, simply chartreuse, ripe avocado and some shaded lilac distress ink for my background.  Like some of the cards I’ve been sharing from the last two days, I started out by blending on some color for my background, for this card I used some shaded lilac distress ink.  Next I added a white Single Stitched Line Rectangle Frame and then, I die cut the hello from white cardstock using the Hello There die and stamped my friend sentiment onto a Essential Fishtail Sentiment Strips banner. After that I adhered my stems and flowers, popping up the top pure poppy flower with foam tape, and then added some iridescent sequins and red and purple Stickles to the centers of the flowers.
My second card was created much the same way as the card above except that I used a few different colors.  I used the colors pure poppy, scarlet jewel, harvest gold, summer sunrise, berry sorbet, canyon clay, simply chartreuse, smoky shadow and some wild honey distress ink for my background.  For my sentiment, I went with a simple white die cut hello using the Thanks & Hello die and added some yellow and orange Stickles to the centers of the flowers.
Above is a picture of all 8 cards that I’ve posted here on my blog over the last few days.  Each card was created with a white card base and either a white stitched frame or white scalloped panel so that the stamped flowers were the showcase of the card and popped.  I stamped a matching envelope for each card and made one set of 8 cards and two sets of 6 cards for a total of 20 cards.  
My first step in creating these cards was to die cut a bunch of the flowers and stems and then using my Misti tool, stamp them in different colors.  The Misti tool made it quicker and easier for me to stamp each of the flowers.  On a piece of 110lb cardstock, I arranged all of my flower dies fairly close together and die cut them then secured the negative die cut cardstock piece down inside my Misti tool.  That way all I had to do was to place my die cut flowers like a puzzle piece into the open space, ink up my flower stamp and stamp it (see photo below). 
In the picture above, you can see 6 of the original 8 cards I made lined up along the top and how I was doing an assembly line to recreate them. In the top photo you can also see how on the right two cards I swapped out the die cut Hellos and went with the die cut Celebrate Today die cuts from a PTI Make it Market Kit. In the photo below you can see how I blended on some of the ink/distress ink onto the pieces I needed and how I was laying out each of the pieces I needed to complete my cards.  You should be able to click on any of these pictures to enlarge them for a better view if necessary.
Well that’s it from me today!  If you have any questions about how I put together any of the cards from this collection just shoot me an email.