Friday, August 28, 2009

Pillow Box Pumpkin Bucket and Card

Happy Friday everyone!!! This week has been a busy one and sure did go by fast but I'm happy that I was able to get some things done so that my kids are ready to go back to school.
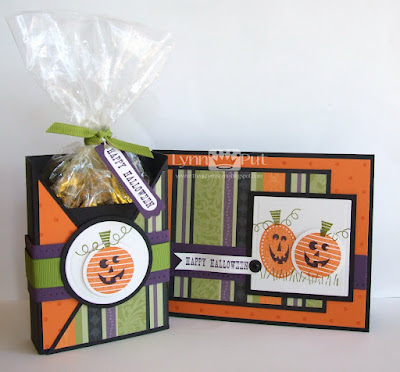
Today I have a Halloween Pumpkin Bucket that I made from my Stampin' Up Sizzix Pillow Box die and a card that I created using Beate's Weekend Sketch. For the card I used the stamp set Pumpkin Patch which is in the new Holiday Mini Catalog coming out next Tuesday. Wait until you see all the fun new goodies in this Mini, your going to love it!


Supplies: Pumpkin Patch, Weathered BG, Grateful Greetings, Cast-A-Spell DSP, Nestie, Ribbon, Button, Piercer, Linen thread, Pop dots. Colors: Basic Black, Pumpkin Patch, Old Olive, Whisper White.

I came up with the idea for this Pumpkin Bucket after looking at my Sizzix dies I had, I was trying to figure out what kind of 3-D Halloween treat I could make when it popped into my head. This bucket took no time at all to make and was fun to put together. What you need is 3 Pillow Boxes cut, creased and sponged with Pumpkin Pie ink, one handle 1" x 11", one large Coluzzle circle (4" in diameter)for inside bottom, three 1" x 4" strips of Pumpkin Pie (only 2 are pictured here but I used 3) and some punched out pieces for the face.


Step one: Cut all pieces and crease and sponge the three Pillow boxes.
Step two: Use Tacky Tape and tape the three boxes together end to end then pick one side to be the top of your bucket and cut the three rounded tabs down so that all of the top of the edges match.

Step three: Apply Tacky Tape to the very ends on one side of the 1" x 4" strips and tape them to the bottom tabs of your bucket (as shown in photo).

Step four: Place cut Coluzzle circle in bottom of bucket and glue on punched pieces for face (I scored the hand cut triangle for nose and used the small photo corner punch for the mouth).

Step five: Make elongated punches on side of bucket using the Horizontal Slot punch and attach handle. I fed the handle strips through the slot and folded it over about a half inch then added a brad to secure the handle.

Thanks for stopping by!


Wednesday, August 26, 2009

Wonderful You Tote with Cards


It's one of those days, its rainy, I'm sleepy and wish I could stay in bed all day and watch old movies. Yeah that's not going to happen!
Yesterday I finish working on this tote and a few more cards to go inside, the card tote is an older pattern and can fit several cards and envelopes inside.
Using one 8 1/2"x 11" sheet of card stock for the card tote and holding your paper vertically I scored 1 1/4" along the right and left outside edges. Then turning your card stock horizontally I scored 4 1/2" on each end which will give you a 2" bottom for your tote. You will need to make short cuts to the 1 1/4" x 2" sections in order to fold your tote up. The straps to the tote are 1 3/4"x 11" and are sandwiched in between the Round Tab punch which was punched and cut in half. If you have any questions please email me and I'd be happy to help.
Supplies: Wonderful You, Best Yet, Nestie, Circle punches, Round Tab punch, Brads, Piercer, Pop dots, Tacky Tape.


This card was created using the Mojo Monday Sketch from yesterday. The Pale Plum back ground was randomly stamped with the outline of the flower and the ribbon was woven through from the front to the back of the card by using the Horizontal Slot punch on the Rich Razzleberry piece.
Supplies: Wonderful You, Teeny Tiny Wishes, Nesties, Brads, Ribbon, Large & small oval punches, Piercer, Pop dots.


This next card was created using the Stamping 411 Sketch, I wanted to use just the leaf stamps from the Wonderful You stamp set for this card and used a neutral color scheme.

Supplies: Wonderful You, Nesties, Ribbon, Word Window punch, Modern Label punch, Piercer, Pop dots.

The cards and the tote use the colors Soft Suede, Rich Razzleberry, Pale Plum, Kraft and Whisper White.
I'd like to try and make a few of these totes with cards as Christmas gifts and use different stamp sets for each one.

Monday, August 24, 2009

SSSC32 - Wonderful You

The days are getting busier with the start of school approaching, this week alone I'll be taking both my two older kids shopping for school clothes and supplies, signing my daughter up for two dance classes, my youngest for a preschool preview class and my oldest son will have Crusaders day (open house) at his new high school. I still can't believe that my oldest is starting high school this year (OMG)! What I can't believe even more is that by the time my oldest is graduating from high school my youngest will be in kindergarten. My kids don't go back to school until after Labor Day so I have two more weeks of summer left that I'm going to try and enjoy.

Today's card is for Karen's Sweet Sunday Sketch Challenge #32, I used one of my favorite stamp sets Wonderful You and two of the new In Colors, Rich Razzleberry and Soft Suede along with Pale Plum.

Supplies: Wonderful You, Nestie, Circle punches, Ribbon, Piercer, Pop dots. Colors: Soft Suede, Pale Plum, Rich Razzleberry, Whisper White.

Sunday, August 23, 2009

Kooky Girl Birthday Card

Today's card is a non-Stampin' Up card that I made for my niece's birthday today, I saw this kooky Basic Grey stamp of this little girl in the $1.99 bin at Archivers and thought she was cute. I used the Mojo Monday sketch from a few days ago and the color purple to create this card since that's my nieces favorite color. I stamped the girl image in Palette black ink, then colored her with my Copic markers, added Crystal Effects to her eyes to make them look glossy and Spica glitter pen to the heart and ruffles on her dress. This was a fun little card to create with all the glitter, gems and flowers!


Supplies: Basic Grey Girl stamp, Teeny Tiny Wishes, Provo Craft Posies Glitter designer paper, Nesties, Copic markers, Spica glitter pens, Flowers, Ribbon, Gems, Button, Scallop edge punch, Crystal lacquer, Pop dots. Colors: Rich Razzleberry, Certainly Celery, Pale Plum, Cool Caribbean.


Friday, August 21, 2009

Updated Craft Studio Pictures

For an updated look at my craft studio, please click HERE.

A couple weeks ago I had my husband hang another shelf and some cork boards above my computer desk in my craft studio which is in our basement, afterwards I cleaned up and decided to take a few shots. No its not always this clean especially if I'm in the middle of creating a card, most of the time you can hardly see the counter top when I get going. I try to keep myself fairly organized because it's such a small space, but it's my space and I love it.


Most of my smaller SU word stamp sets I keep above my work area along with my back ground stamps and the rest I keep in my closet organized according to theme. I keep loose cut ribbons in a candy jar, buttons in these little stack able containers I found at Joann's, flowers in larger jars and all of my brads and doo dads in Art Bin containers. I keep my embossing folders and Spellbinder dies in a green bin directly above my cutting area (the rest of my Sizzix dies are in drawers) and I love the white rain gutter that my husband cut and hung for all of my ribbon. I keep white, neutral and the SU In Colors sitting at the end of my work space along with my 12"x12" designer papers. The rest of my paper is stored underneath in the cabinets in hanging file folders.


Below is a shot of the other side of the room where my computer desk is. The shelf and three squares of cork board are the new additions to the room, before this wall was bare but now I can pin up notes, cards and messages with either magnets or push pins (I found these at Joann's on sale). Above the cork boards I have boxes for photos to scrapbook one for each of my kids and one for family. The walls in my room are painted a pale yellow, I wanted a warm sunny color since I'm in the basement.


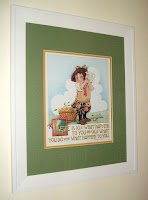
At each end of the room I have matted and framed Mary Engelbreit prints, two of my favorites of hers (I adore her work and have for years). The one above my work area reads: To love what you do and feel that it matters-how could anything be more fun? and the other print reads: Life is 10% what happens to you and 90% what you do with what happens to you.


I hope you enjoyed a peek at my little craft space!
Thanks for stopping by!


TESC79 - Inspired by Nature

For today's card I used the stamp set Inspired by Nature and the Taylored Expressions Cupcake Sketch. I've only made one card with this new stamp set other than this and I just wanted to make something clean and simple with it today. For the daisies I used Pink Passion, Summer Sun and Old Olive markers directly on the rubber stamp, then stamped the image and added Dazzling Diamonds to the yellow centers of the flowers.


Supplies: Inspired by Nature, Best Yet, Mellon Mambo DSP, Embossing folder, Circle punches, Photo corner punch, Ribbon, Rhinestone brads, Dazzling Diamonds. Colors: Mellon Mambo, Old Olive, Summer Sun.

Have a great weekend!


Thursday, August 20, 2009

Mojo Monday Day 4 - Falling Leaves

Happy Thursday everyone! Thursday is my favorite day of the week because it means that the week is more than half over and the weekend is almost here! This is a quick post because Project Runway is about to come on TV at 10pm and I've been waiting to watch the new season.
The card for today was created by using the Mojo Monday sketch Day 4 and the stamp set Falling Leaves.


Supplies: Falling Leaves, Circle punches, Large oval punch, Ribbon, Brads, Piercer, Pop dots. Colors: Chocolate Chip, Soft Suede, More Mustard, Really Rust.


Wednesday, August 19, 2009

Favorite Brother

The card that I have for today is one that I made for my brother's birthday which was yesterday, I have two older brothers both of which are my favorite, lol. I say that because one brother feels that the other brother is a favorite but really I feel doubly blessed to have such great men to call my brothers, their the best any sister could ask for.


For this card I used the Mojo Monday Sketch from yesterday (the Mojo Monday blog is celebrating 100 challenges this week by having a sketch each day) this sketch worked great for the stamp set I wanted to use. I wanted the card to be masculine and bold so I went with the stamp set Nature Silhouettes and strong colors like the basic black, grey and kiwi kiss. The moon was created by punching out a 1"circle from scrap paper and using temporary adhesive to apply it where I wanted the moon to be and sponging color all around it.
Supplies: Nature Silhouettes, Upsy Daisy (for saying), Urban Oasis DSP, Key tag punch, Ribbon, Brads, Piercer. Colors: Basic Black, Basic Grey, Going Grey, Kiwi Kiss, Whisper White.

Happy Birthday Gary!

Tuesday, August 18, 2009

Gifts of the Earth - Mojo/411

Hello friends! Today's cards are for two different sketch challenges but use the same Gifts of the Earth stamp set which is from the up coming Holiday Mini Catalog. The first card above is for the Stamping 411 Sketch Challenge, I enjoyed using this sketch just as much as last weeks and was so surprised when the card I created for last weeks 411 challenge was chosen as one of the top five. You can click here to view the top five 411 challenge cards chosen.
For this card I used a Chocolate Chip card base, then More Mustard stamped with the Sanded back ground stamp and added a 2 3/4"x 5 1/4" panel of the Autumn Traditions designer paper. The main image was stamped, cut and embossed using my Nesties die and colored with an aqua brush and SU markers. The large saying is from the stamp set Grateful Greetings which is also in the up coming Holiday Mini Catalog and the Grateful saying is from the stamp set Falling Leaves.


Supplies: Gifts of the Earth, Autumn Traditions DSP, Grateful Greetings, Falling Leaves, Sanded, Ribbon, Brads, Word Window punch, Modern Label punch, Aqua brush, Markers, Nestie, Pop dots. Colors: Chocolate Chip, More Mustard, Pumpkin Pie, So Saffron, Summer Sun, Going Grey, Close to Cocoa, Ruby Red, Creamy Carmel.

This second card is for the Mojo Monday Sketch Challenge and uses the turkey from the Gifts of the Earth stamp set. The card base is Chocolate Chip, then the next panel is the In Color Soft Suede with the bottom portion stamped with the Weathered back ground stamp in Close to Cocoa. The pine cone paper is from the Autumn Traditions designer paper and the circular Happy Thanksgiving is from the stamp set Falling Leaves which was stamped in Soft Suede. The little acorn was stamped in Close to Cocoa and then I took a Chocolate Chip marker to the top of it, then stamped it and punched it out with a circle punch and pop dotted it. For some odd reason in this picture the Chocolate Chip ribbon looks like it doesn't match but IRL it matches great, hmmm.

Supplies: Gifts of the Earth, Weathered BG, Autumn Tradition DSP, Falling Leaves, Nestie, Ribbon, Circle punches, Aqua brush, Piercer, Pop dots. Colors: Chocolate Chip, Soft Suede, Close to Cocoa, Old Olive, More Mustard, Ruby Red.

Thanks so much for stopping by!

Friday, August 14, 2009

Pumpkin Patch Fun

TGIF everyone! This week seemed so long, I'm glad today is Friday. Today my sister-in-law Jen came over and we did a little stamping and had some fun. I made this Halloween card and Criss Cross treat box using the new Holiday Mini stamp set Pumpkin Patch and Cast-A-Spell designer paper. I've used this Criss Cross box before with different stamps and for other occasions and thought I would use it for a Halloween treat this year. The Criss Cross box template was found on Nichole Heady blog Capture the Moment.


Supplies: Pumpkin Patch, Polka Dot BG, Cast-a-spell DSP, Circle punch, Nesties - square and circle, Brad, Ribbon, Word Window punch, Modern Label punch, Piercer, Pop dots, Glue dots. Colors: Basic Black, Pumpkin Pie, Old Olive, Elegant Eggplant, Whisper White.


Have a great weekend!


Wednesday, August 12, 2009

SFYTT - Inspired by Nature

Today I got some exciting news, I found out that the card I created for last weeks Mojo Sketch Challenge was chosen along with six other women as a winner!!! Woo Hoo I was so excited when I found out, the winners receive their choice of any Verve stamp set up to $24. This was such a great surprise and honor to have been chosen.

Today's card is for Jen's Sketch for You to Try Challenge, I really liked the different panels and layers that this sketch had to offer. I started out by stamping the grass image onto a 3"x4 1/4" piece of Whisper White and matting it with a 5"x 3 1/4" piece of Old Olive card stock. The horizontal Mellon Mambo strips of card stock measure 1/2" and 1 1/8" x 4".


Supplies: Inspired by Nature, Flight of the Butterfly, Mellon Mambo DSP, Ribbon, Brads, Butterfly punch, Key tag punch, Horizontal slot punch, Piercer. Colors: Mellon Mambo, Old Olive, Whisper White.


Tuesday, August 11, 2009

Twick or Tweet

Is it Halloween time yet? I don't know about the rest of you but I'm a BIG fan of Halloween, I like cute and fun Halloween not creepy blood and guts Halloween. So when I saw the new Halloween stamp sets in the up coming Stampin' Up Holiday Mini catalog I knew I would have fun creating with them. This first card is for the Mojo Monday Sketch Challenge which was a little difficult for me because I like things all straight and lined up and the sketch called for two strips on different angles. This card turned out to have way too many layers on it, more than I thought I was going to use but I liked the Old Olive Top Note layer because it added more color.


Supplies: Twick or Tweet, Cast-A-Spell DSP, Top Note Sizzix die, Nestie, Circle punch, Corner tag punch, Cuttlebug embossing folder, Piercer, Ribbon, Brad, Dazzling Diamonds (on the stars in hat), Aqua brush, Pop dots. Colors: Basic Black, Elegant Eggplant, Old Olive, Only Orange, Summer Sun, Whisper White.


This second card was created using the sketch from the Stamping 411 site, this is the first time I've participated in one of their sketch challenges and I enjoyed it. This was a fun and easy card to create, I used the Cast-A-Spell designer paper along the top of the card and rolled the Haunting Hill wheel with Old Olive ink on the bottom of the card. I love this image from the Twick or Tweet stamp set, it makes me smile, after stamping the image in black I used my aqua brush with a little Old Olive on it and added some color. I think it would be fun if someone came out with some glow in the dark ink for Halloween, would that be neat?


Supplies: Twick or Tweet, Haunting Hill wheel, All Holidays, Cast-A-Spell DSP, Nestie, Word Window punch, Modern Label punch, Brads, Piercer, Aqua brush, Ribbon, Pop dots. Colors: Basic Black, Old Olive, Whisper White.


Thanks so much for visiting!