Hello there! I'm back for my second post as a guest designer forConcord & 9th. This time I used the fun newHugsstamp set andHugs Card dieto create a gift set.
First off, I have to tell you that this new Hugs die that Concord & 9th has created is ingenious, it's original and super easy to use. If you have any questions on how this Hugs die works you click hereto watch the Concord & 9th You Tube video but in all honesty its even easier to use than it looks.
For my card, I started out by using a piece of mixed media paper which is light weight and can handle watercoloring and I stamped and heat embossed the oranges with white embossing powder (I embossed a few extra oranges on some scrap mixed media paper to use as embellishments). Once I was done with that, I used my Gansai Tambi watercolors to add color to my oranges and set it aside to dry. Next I used the Hugs die and die cut my card from white cardstock. I also die cut the Hugs die in orange cardstock and Doodlebug Designs chevron orange glitter paper and glued the two together slightly off so the die cut glitter Hugs would stand out. Once my watercolored panel was dry, I cut it down the middle and adhered it to the front of my card along with a die cut vellum circle and die cut white frame. Next I adhered my glittered die cut hugs with some glue, added a few orange slices and stamped and heat embossed my inside sentiment with white embossing powder onto a die cut circle of orange cardstock.
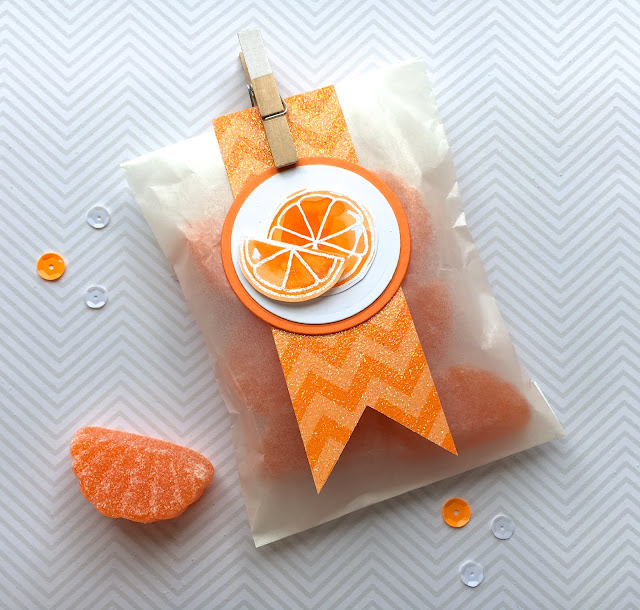
The little treat bag was simple, I used a glassine bag, added a banner of the matching orange glitter paper with two die cut circles of orange and white cardstock and few more of my watercolored oranges. Inside the bag I added some sweet sugared orange slices.
I'm blaming my friend and Color Throwdown team mate, Barbara Anders for the reason I ordered this MFT's Pretty Posies stamp set. With all of Barb's beautiful creations using this set I was in love and had to have it. So for today's card, I paired the Pretty Posies with the Adorable Elephants set and the fun Circle Grid stencil for my background.
I used my Zig Clean Color pens and watercolored all of my stamped flowers, elephant, butterflies and background sky, then used my Zig Wink of Stella glitter pen over the flowers and butterflies (wish it showed in the pictures). And for my stenciled background, I used some broken china distress ink.
Hello! Hope your week is going well so far. It's Wednesday and time for this week's Color Throwdown Challenge.
For my card, I used the Concord & 9th stamp sets, Flourish and Sophisticated Script. I guess I got creating this card and ended up taking some liberties with the colors for this week's challenge. I went with more berry colors and a tope instead of a gray, I found that out once I was posting my card, whoops. Anywho, I went with a white card base, then added a panel of scarlet jewel and then my stamped piece with a white scalloped edge along the bottom. For the stamping, I used sahara sand ink and stamped the large branch. Next I stamped the largest flower which is three step stamping and used rose red, cranberry crisp and scarlet jewel ink (PTI). Then to make my lighter colored flowers stand out on my beige paper, I stamped them white craft ink and let them dry for a few minutes before stamping them in cameo coral and rose red. Once all of my flowers were stamped, I inked up the large branch stamp again and stamped off before stamping onto my cardstock. This gave a subtle look and some added interest to the lower portion of my card. I also used the white craft ink to stamp some of the dotted filler flowers and finally once my layers were adhered together, I tied on some twine.
Happy Friday the 13th, friends! I've got some exciting news to share! I'm guest designing this month for Concord & 9th and I'm thrilled. If you're familiar with Concord & 9th then you know how unique and beautiful their products are, if not you really need to hop over and see what you've been missing. I can't wait to share the projects I've created for this month's release using the fabulous new products!
Today I'm showcasing the new You've Got This die along with the You Are Enoughstamp set. I love the combination of using these two new products together. So many times I've needed an encouragement card and the You've Got This die sums it up perfectly, its so versatile in the ways that you can use it. And the You Are Enough stamp set with it's willowy illustrated flower just begs to be watercolored.
For my first card, I used a piece of watercolor paper and randomly stamped the flower in black ink from the You Are Enough stamp set. Once my ink was set, I loosely watercolored the flowers using my Gansai Tambi watercolors (dark pink, scarlet red & mid yellow). After the watercoloring was dry I watered down some white acrylic paint and added some white splatters of paint onto my watercolored flowers. While that was drying, I die cut the you've got this from black cardstock and a piece of craft foam and glued the two together to add dimension to my sentiment. Going back to my watercolored panel, I die cut a rectangle from the center, matted it with black cardstock and adhered it with foam tape, lining up the stamped images. Next I adhered my sentiment and matted the whole piece in black and added a few black and silver sequins.
For my next card, I instead of popping up the die cut sentiment I die cut it and backed it up with colored cardstock. I used a piece of watercolor paper and stamped the flower image twice, one in each corner. I used my Misti tool to not only stamp the piece of watercolor paper but also the card base. I have a short slide show below to walk you through the steps if you're interested in seeing them. Again I used my Gansai Tambi watercolors (pale aqua, green & light brow) to watercolor my stamped panel, adding splatters of the aqua. Once the panel was dry, I die cut my sentiment, adhered a piece of tropical teal cardstock to the back side of it and added it to my card front with foam tape. To finish it off I added some yellow Stickles to the center of the flowers and glue on some sequins.
Thank you for joining me today and be sure to check back next week with another Concord & 9th product showcase!
Hello and welcome to my blog! This is where I share my love of stamping & paper crafting! Thanks for stopping by, I hope you enjoy the projects I share here and they inspire you to create and share handmade cards of your own.
I am affiliated with Concord & 9th , Scrapbook.comand Simon Says Stamp.If you shop through my links I receive a small commission from my affiliate providers at no cost to you. I are very grateful of anyone who shops through my affiliate links and I use my commissions to help pay for the expenses of running this blog.
The Queen’s Scene Blog is a personal hobby blog with the sole purpose of sharing paper crafting projects. It is non-profit and does not make use of any personal information shared in any comments or any third-party applications such as email subscriptions services.
By commenting, you are giving consent for your name and/or a link to your Blogger profile being visible.
The Queen’s Scene blog owner reserves the right to revise this policy statement as needed. Effective May 25, 2018