For my card I used the fun Lawn Fawn stamp set, Party Animal along with the coordinating dies. The detail work is in the little animals and accessory pieces. I colored the bear, birds, party hats and cake using Copic markers and for the balloons I ended up paper piecing from some scrap paper I had from my stash. I die cut a square of white cardstock and a quarter of a circle from chocolate chip cardstock for a hill and arranged my scene, popping up the two birds and birthday cake. I added the square scene I created to a panel of pure poppy stripped designer paper which I die cut using a stitched rectangle die and under that I added a white scalloped panel. I stamped my happy birthday sentiment on a strip of white cardstock and adhered that across the lower portion of my card.
Hello there! It's my turn to host over at the Color Throwdown Challenge this week and I've chosen some fun summertime colors for us to create with. I hope you'll join in and play along.
For my card I used the My Favorite Things stamp set, You're the Sweetest along with the MFT One Way Chevron stencil for my background. I started out with a white card base, then added a piece of raspberry fizz cardstock that I stenciled using the One Way Chevron stencil. Then I die cut and stamped my ice cream cones using limeade ice, raspberry fizz, daffodil delight and more mustard inks. I adhered my ice cream cones to a square of white cardstock, popping up the ice cream on the center cone. After that I added my happy birthday banner and stamped the second half of my sentiment. I added some Glossy Accents to the cherry on the center ice cream for some dimension.
Hi there! Hope you're doing well! Today I've got a post here on my blog and over at the Concord & 9th blog where I'm sharing a gift set that I created early last month while I was a guest designer for Concord & 9th. If you've had this fun Concord & 9th Hugs die or Hugs stamp set on your wish list or have been waiting for it to come back in stock, now is your chance to grab it up!
For my card and matching gift box, I used the Hugs die and coordinating Hugs stamp set along with the flowers from the Flourish stamp set. I used a piece of white 12"x12" cardstock to create both my card and gift box and a piece of black cardstock for my die cut hugs for on my card and box.
I started out my card by die cutting with the Hugs die, you can see a video on how this fantastic die works by clicking here. Once my Hugs was die cut, I stamped my flowers in raspberry fizz, hibiscus burst and lovely lady ink, stamping off with some of the flowers. Then I did some ink blending along the top and bottom of my card using the same ink colors that I stamped the flowers in. After that I used the Hugs die again to die cut my black cardstock and adhered them onto my card front. Next I stamped the sentiments and hearts from the Hugs stamp set and glued on some silver sequins to finish it off.
The gift box I created was made with the same supplies as my card except I made it into a box. You can view step-by-step directions in the slideshow below.
Wouldn't this be fun to give with a bunch of Hersey Kisses inside?
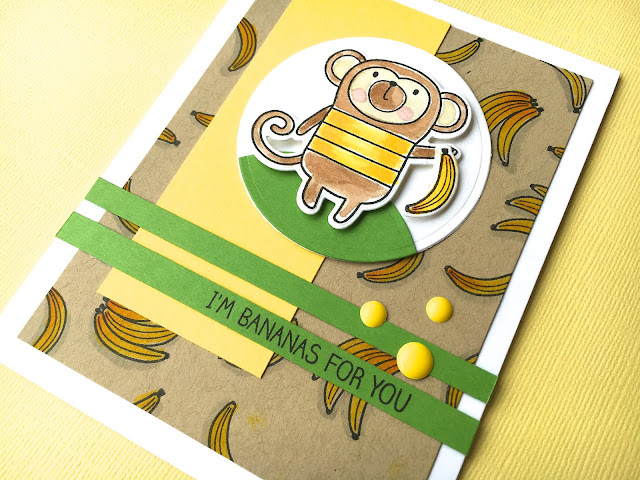
For my card, I used the MFT Cheeky Monkey stamp set. I started out with a white card base, then stamped the different banana images from the set onto kraft cardstock and colored them using my Zig Clean Color pens. For the monkey, I stamped him on watercolor paper, die cut him and colored him with my Kuretake watercolors and once he was dry I using foam tape to adhere him onto a die cut circle.
Hello and welcome to my blog! This is where I share my love of stamping & paper crafting! Thanks for stopping by, I hope you enjoy the projects I share here and they inspire you to create and share handmade cards of your own.
I am affiliated with Concord & 9th , Scrapbook.comand Simon Says Stamp.If you shop through my links I receive a small commission from my affiliate providers at no cost to you. I are very grateful of anyone who shops through my affiliate links and I use my commissions to help pay for the expenses of running this blog.
The Queen’s Scene Blog is a personal hobby blog with the sole purpose of sharing paper crafting projects. It is non-profit and does not make use of any personal information shared in any comments or any third-party applications such as email subscriptions services.
By commenting, you are giving consent for your name and/or a link to your Blogger profile being visible.
The Queen’s Scene blog owner reserves the right to revise this policy statement as needed. Effective May 25, 2018