skip to main |
skip to sidebar
 Today I'm excited to share that I was asked to do a few guest designer post for My Favorite Things. This is the second time I've been asked to guest design for MFT and a true honor. So for my first post, I'm sharing some colorful and fun cards that I've created using products from this month's MFT release.
For my first card, I wanted to come up with something different using the You're A-maze-ing stamp set and thought it would be fun to combine the set For Owl You Do and You're A-maze-ing set to make an OWL-maze-ing card. I started out with a white piece of cardstock, cut to a card front size, and using my Misti tool I lined up all of the owl stamps in different directions and stamped them in black ink. Next I used a Stitched Scallop Basic Edges die and die cut the bottom edge of my stamped piece. For the bottom of my card, I stamped the You're A-maze-ing sentiment in black ink onto a piece of yellow cardstock cut to size and adhered it to my card front. Then on a piece of black cardstock, I stamped and heat embossed in white just part of the For Owl You Do sentiment, trimmed it down, matted it and adhered it over the A of the A-maze-ing portion of my sentiment. Next I added a horizontal strip of black cardstock and my stamped and die cut Maze with a popped up yellow die cut heart in the center. On top of that, I added an owl which I stamped and colored with Copic markers and die cut using the coordinating For Owl You Do Die-namics (he looks like a cape crusader doesn't he?). As a final touch, I added some colorful enamel dots.

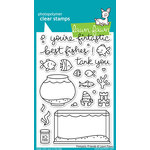
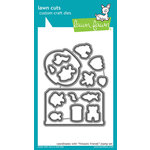
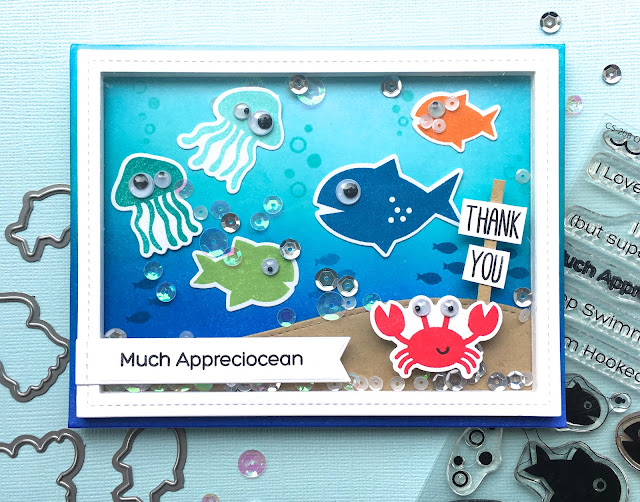 For my second card, I used the cute new Ocean Fun stamp set to create a shaker thank you card. I started out by doing some ink blending for my background onto a piece of white cardstock. I used blueprint sketch, mermaid lagoon, peacock feathers and tumbled glass distress inks. I stamped the sea-life images in primary colors, die cut them out using the coordinating Ocean Fun Die-namics and added them to my ink blended panel. Once my fish were adhered, I added googlie eyes to all the images and I stamped some bubbles and small fish in the background. Next I stamped two sentiments, one from the Ocean Fun set onto a Stitched Sentiment Strips and the thank you from the For Owl You Do set onto white cardstock which I cut down and made into a sign that the crab is holding. To create my shaker, I used the Single Stitched Line Rectangle Frames die and foam tape and filled the shaker with iridescent and silver sequins.

 For my third and final card for today, I used the adorable Birdie Brown set, Party Like a Pirate. The first thing I did to create my card was to stamp some of the images and color them using Copic markers and then die cut them out using the coordinating Party Like a Pirate Die-namics. To create my small scene, I blended on some mermaid lagoon distress ink (appropriate huh?) onto a die cut circle and added my images with foam tape. Under my images I added my sentiment which I stamped onto a die cut Essential Fishtail Sentiment Strip. For my card base, I used a piece of red cardstock which I
randomly stamped with the skull image from the set with red ink and a strip of black cardstock and since I didn't have black and white striped paper, I made my own using the Diagonal Stripes Stencil and black ink.
For my third and final card for today, I used the adorable Birdie Brown set, Party Like a Pirate. The first thing I did to create my card was to stamp some of the images and color them using Copic markers and then die cut them out using the coordinating Party Like a Pirate Die-namics. To create my small scene, I blended on some mermaid lagoon distress ink (appropriate huh?) onto a die cut circle and added my images with foam tape. Under my images I added my sentiment which I stamped onto a die cut Essential Fishtail Sentiment Strip. For my card base, I used a piece of red cardstock which I
randomly stamped with the skull image from the set with red ink and a strip of black cardstock and since I didn't have black and white striped paper, I made my own using the Diagonal Stripes Stencil and black ink.
 Thanks so much for stopping by!

 Hello! It's Wednesday and time for a new Color Throwdown Challenge. It's my turn to host the challenge for this week and I chose my colors based on the flower bouquets in the inspiration photo with it's pretty hydrangeas, purples and rich violets.
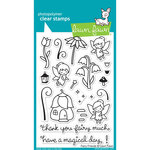
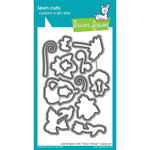
 For my card, I used the sweet Lawn Fawn Fairy Friends stamp set and coordinating Fairy Friends Lawn Cuts. I'm also entering this card into the current Lawn Fawnatics Challenge which is to create a card with Watercolor.
 I started out by watercoloring a piece of watercolor paper using teal and mint green watercolors. While that was drying, I stamped and colored my images using Copic markers then die cut them out. Once my background was dry, I used my Misti tool and stamped my sentiment and the star images above where the fairy house is then slowly adhered each piece of my scene, popping up the fairies, house and three mushrooms. Once everything was in place, I adhered my watercolored panel onto a white card base and added a die cut scalloped rectangle frame. As a finishing touch, I used my Wink of Stella glitter pen and added glitter to the fairies wings, dresses, house and flowers then added lime green loose glitter to the magic wand, background stars and fronds. It's always hard to try and capture glitter, metallic or shiny things in photos but I tried.

 For more inspiration, check out the design teams' blog links below OR you can go to the Color Throwdown blog for details on how to play along and you can see all the sample entries in one location.
Amy Rohl
Amy Rysavy