Pages

Monday, June 29, 2020

Have a Wild Birthday

 Hello there! I’m up over on the Sunny Studio Stamps blog today sharing a card I created featuring the fun Savanna Safari stamps and dies.
 To create my card, I started out by stamping some of the adorable animal images from the Savanna Safari stamp set and coloring them using Copic markers then I used the coordinating Savanna Safari dies to die cut them out. I also used the Tropical Scenes stamp set and dies and used the palm tree and vines images.

For my background I die cut a piece of the Summer Splash cardstock using the Frilly Frames Retro Petals dies and matted that piece with some green cardstock. I used the Stitched Semi-Circle dies with white cardstock and blended on some carved pumpkin and mustard seed distress oxide ink along the top and stamped the bottom with the water/hill image from the Tropical Scenes set which I colored using Copic markers. I stamped my sentiment onto a banner and added some tropical leaves from the Radiant Plumeria stamp set and dies. After that I adhered my animal images, popping up the lion and toucan bird with foam tape.

Thursday, June 25, 2020

You Brighten my Day - CTD599

Hello there! It’s time for this week’s Color Throwdown Challenge where we have some fun new colors for all of us to create with.
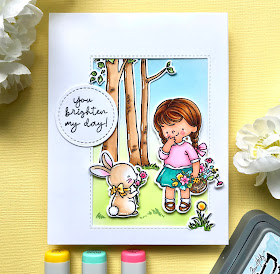
For my card I used the sweet Picked for You Hello Bluebird stamp set and dies. I kept my card clean and simple other than the images. I stamped and colored my images using Copic markers then used the Pick For You dies and die cut them out. 

Next I used a stitched rectangle die and die cut a piece of white cardstock. On my actual white card base, I blended on some tumbled glass and twisted citron distress oxide ink and stamped two of the grass images along the bottom and then adhered my die cut panel over top. After that I added my images popping up the girl and bunny with foam tape and then stamped my sentiment onto a stitched die cut circle.
For more inspiration, check out the design teams blog links below or you can go to the Color Throwdown blog for details on how to play along and see all of the sample entries in one location.

Amy Rohl
Amy Rysavy
Thanks so much for stopping by!
Don't forget, you can follow me on InstagramTwitter and Pinterest to see what I'm up to.

Monday, June 22, 2020

You’re the Burger to my Fries

Hello there! I’m up over on the Sunny Studio Stamps blog today sharing a card I created featuring the fun Cruisin’ Cuisine and dies.
The Cruisin’ Cuisine stamp set is such a fun set with so many options to switch up the cute food truck with hot dogs, ice cream and more. The first thing I did to create my card was to stamp the two images from the set, the truck and hamburger with fries. I also stamped the three bottles of sauce and added the words burger bus on the door. I colored these images using Copic markers and then used the Cruisin’ Cuisine dies to die cut them out.
Once my images were done I used two pieces of the Classic Gingham Cardstock paper one in red and another in yellow and I used the Frilly Frames Retro Petals dies to die cut a stitched edge on both pieces. Next I used my Misti tool and stamped my sentiment on the yellow bottom piece, added a strip of black cardstock above and die cut a Stitched Semi-Circles from white cardstock. I added my images using foam tape and my card was complete.

Wednesday, June 17, 2020

Have a Sweet Birthday - CTD598

Hi there! I’m hostess this week over on the Color Throwdown Challenge and I’ve chosen the colors pink, aqua, gold and white. I hope you’ll take the time to play along!
For my card, I used the Lawn Fawn stamp set Baked With Love along with the coordinating Baked With Love dies and I created a slimline card with lift the flaps. I used this week’s CTD colors and the current Lawn Fawnatics Challenge which is Interactive Cards.
To create my card, I first stamped out images from the Baked With Love stamp set and colored them using Copic markers then die cut them out. Then I thought it would be fun to have some cute animals mixed in with the baking images so I stamped a batch of the little ducks from the Rub-a-Dub-Dub set, colored them and used the coordinating dies to die cut them out.
Next I used the Small Slimline with Lift the Flaps die and die cut a piece of pretty in pink card stock and then used some pretty in pink ink to randomly stamp the two cupcake images from the set and to also blend around the edges of my die cut piece. I used a piece of aqua mist card stock for under the flaps and again randomly stamped the cupcake images this time in aqua mist ink then adhered the pink die cut piece and aqua piece together. 
After that it was fun to added my stamped images to my card creating little scenes within each square. For some dimension I popped up the little ducks on the top flaps with some foam tape and for my sentiment I stamped it onto a banner that I die cut using the Everyday Sentiment Banners.
For more inspiration, check out the design teams blog links below or you can go to the Color Throwdown blog for details on how to play along and see all of the sample entries in one location.

Amy Rohl
Amy Rysavy
Thanks so much for stopping by!
Don't forget, you can follow me on InstagramTwitter and Pinterest to see what I'm up to.

Monday, June 15, 2020

Hello Friend

Hi there! I’m up over on the Sunny Studio Stamps blog today sharing a thinking of you card I created featuring the new Frilly Frames Herringbone die.
 To create my card, I started out by die cutting a piece of white card stock using the Frilly Frames Herringbone die. I die cut using both the inner herringbone piece and the outer frame piece. And that’s something I love about the design of the frame dies from Sunny Studio Stamps because so many of them can be interchanged so that you can use a herringbone design for the inside but maybe mix it with a scallop or different design for along the outer edge.
 Once my Herringbone Frame was die cut, I used the new Potted Rose stamp set and stamped several of the roses and leaf images stamping them in melon berry, canyon clay, terra-cotta tile and pure poppy ink for the roses and limeade ice and simply chartreuse for the leaves. Once my images where stamped I used the Potted Rose dies to die cut them out.

In the center of my white card base I blended on some scattered straw and wild honey distress oxide ink then glued on my outer white frame. Next I adhered a rose and leaf image in two of the corners and then glued on my white herringbone piece. After that I stamped my sentiment onto a white die cut circle and added the remainder of my rose and leaf images popping up the one rose with foam tape.

Sunday, June 14, 2020

My Heart is With You - Spellbinders

 Hello! I’m popping in today with a card that I created using the Spellbinders Large Die of the Month which is the Geometrical Floral Frames.
 Geometrical Floral Frames from this months Large Die of the Month kit come with a circle frame and an oval along with several floral and stem dies so that you have a wide variety to choose from when creating a card. I used the oval frame and die cut it twice from espresso card stock along with three stems, then I die cut four of the leafy stems from kraft card stock. the remaining leaf and flowers where die cut from pretty in pink, pirouette pink and hibiscus burst card stock. 

Once I had all of my pieces die cut, I used a panel of white card stock and blended on some spun sugar distress oxide ink in the center, heat dried it and used my Misti tool to stamp my sentiment which was from the Papertrey Ink set, Penned Elegance. I used foam tape and adhered my blended ink panel onto a kraft card base and then added my die cut pieces. As a final detail, I added pearls to the center of some of the flowers and around the die cut stems.

Wednesday, June 10, 2020

Best Fishes and Mermaid Kisses - CTD597

Hello crafty friends! It’s Wednesday and time for this week’s Color Throwdown Challenge where we have some great new colors to create with.
For my card, I used this week’s CTD colors and the current Create a Scene Lawn Fawnatics Challenge #78 to create a slimline mermaid birthday card using the Lawn Fawn Mermaid for You stamp set and dies.
The first thing I did to create my card was to stamp out several images from the Mermaid for You stamp set and to color them using Copic markers then die cut them out using the Mermaid for You dies. I also stamped out some fish & a crab from the Fintastic Friends set and dies, a fish from the Duh-nuh set and dies, a small seaweed from the Seahorsin’ Around set and dies and bubbles and a small rock from the You are Sublime set and dies. It’s great how all of these sets can work together to create a scene.
Once that was completed, I used the new Small Slimline with Lift the Flaps die and die cut a piece of white card stock. Next I started blending on some distress oxide inks. Starting at the top of my die cut piece I blended on some tumbled glass, mermaid lagoon, wilted violet, seedless preserves and at the bottom faded jeansAfter my ink blending was completed, I used a paint brush and splattered on some water droplets and lifted them with paper towel.
 Next I used my Misti tool to stamp part of my sentiment. The Best Fishes sentiment is from the Fintastic Friends set which I stamped along the top, the “and” is from the Rub-A-Dub Dub set (yes I looked through all of my Lawn Fawn sets to try and find the words I wanted) and for the words Mermaid and Kisses, I heat embossed them onto black card stock using white embossing powder. The word Mermaid was from the Mermaid for You set and the Kisses was from the Bugs and Kisses set. 
I die cut a piece of kraft card stock using the Small Slimline die and the Stitched Hillside Borders die and then blended on some walnut stain distress oxide ink and attached it to the bottom of my panel tucking in a few seaweed images. After that I added all of my images popping up the mermaids with foam tape.
Once everything was adhered, I added some lime green glitter to the mermaid tails, some clear Wink of Stella glitter pen to all the fishes and some Glossy Accents to all of the bubbles to make them shine.
For more inspiration, check out the design teams blog links below or you can go to the Color Throwdown blog for details on how to play along and see all of the sample entries in one location.

Amy Rohl
Amy Rysavy
Thanks so much for stopping by!
Don't forget, you can follow me on InstagramTwitter and Pinterest to see what I'm up to.

Monday, June 8, 2020

Summer Hello

 Hello there! I’m up over on the Sunny Studio Stamps blog today sharing a fun tropical summer card I created featuring the new Radiant Plumeria stamp set and dies.
 To create my card, I started out by stamping a bunch of the images from the Radiant Plumeria stamp set and then used the Radiant Plumeria dies to die cut them out. Most of the images from this set are multi step stamping to give each stamped image wonderful detail. I used hibiscus burst, raspberry fizz and daffodil delight inks for the flowers and limeade ice and new leaf for the leaves.
 To create my background I used the Sun Ray dies and a rectangle die to created my own stencil and then blended on scattered straw and wild honey distress oxide inks. Before stamping my sentiment I used my heat tool to make sure my blended background was completely dry and then using my Misti tool I stamped my sentiment in black ink. Once my background was done, I adhered my tropical flowers and leaves popping up two of the flowers with foam tape. I also added a few pink Iridescent Pastel Confetti for bit of sparkle.

Wednesday, June 3, 2020

Bug Deal Slimline Card - CTD596

 Hello crafty friends! It’s Wednesday and time for this week’s Color Throwdown Challenge. I hope you’ll take the time to play along.
I’ve been waiting for Lawn Fawn to come out with new slimline dies since the popularity of slimline cards seems to be a big hit and I’m glad they did with their mini release a few weeks ago. I’ve made a few slimline cards before but having the stitched dies makes creating one even better. I had so much fun creating this card!
 For my card, I used the new Small Slimline with Lift the Flaps die along with the fun Hey Lady stamp set and Hey Lady dies and A Bug Deal stamp set and dies
 To create my card I started out by stamping, Copic marker coloring and die cutting a bunch of images from both the Hey Lady and A Bug Deal sets. Next I used the Small Slimline with Lift the Flaps die and die cut a piece of new leaf card stock. Once that was die cut, I used the large leaf from the Hey Lady set and some new leaf ink and randomly stamped my die cut piece then blended on some lucky clover distress oxide ink along the edges.
 Next I used the circle die from the inside of the magnifying glass and die cut the center flap so the lady bug would actually be inside the flap. After that I used a piece of noble fir card stock to mat my die cut piece and again randomly stamped the large leaf image from Hey Lady with new leaf ink. 
 Once that was done, I adhered my die cut piece with the flaps and added my images popping up the caterpillar and leaf, the center lady bug and the butterfly with foam tape. I love the surprise of lifting the flaps to see what fun is underneath.
For more inspiration, check out the design teams blog links below or you can go to the Color Throwdown blog for details on how to play along and see all of the sample entries in one location.

Amy Rohl
Amy Rysavy
Thanks so much for stopping by!
Don't forget, you can follow me on InstagramTwitter and Pinterest to see what I'm up to.