Pages

Thursday, January 31, 2019

Rub-A-Dub-Dub - Day 2 Card Series

 Good morning! We’re in the middle of a deep freeze here in Michigan with some of the coldest weather we’ve since in a long time. It makes me want to hibernate like a bear, except a bear that likes doing paper crafting and reading lol.
I’m back with Day 2 of my Rub-A-Dub-Dub  Card Series and today I’m sharing a horizontal friendship card using similar supplies as my card from yesterday but just changing up the layout. I purchased this stamp set last year and made a few cards with it but then set it aside and moved on to something else (I know I’m not the only one who does this right?). Well I thought it was time that this set saw some ink and I created some more cards with it. Since I shared the first card yesterday on a Wednesday, I might start a catch phrase and once a month do a “Work-it Wednesday” where I work over a set and make a series of cards.
 To create my card, I started out with a white card base, and then die cut two rectangles using the Outside In Stitched Rectangle dies, one from a piece of aqua gingham Doodlebug paper and one from white cardstock. I used a piece of brown Knock on Wood paper and die cut that using the smaller rectangle for my floor. Next I stamped part of my sentiment along the top and the other part onto a white banner for along the bottom. After that, I had stamped and Copic colored a bunch of the images from the Rub-A-Dub-Dub set and had them die cut out using the Rub-A-Dub-Dub dies so I arranged and adhered them onto my card front popping up the bathtub, large duck, soap and small duck with foam tape. To make my bathtub extra bubbly, I added some individual bubbles back behind the ones that form a solid bubble piece and once my card was put together, I used some Glossy Accents on several of the bubbles to make them look wet.
Thanks for stopping by, be sure to pop in tomorrow for the next card in my Rub-A-Dub Dub series.
Wednesday, January 30, 2019

Rub-A-Dub-Dub - Day 1 Card Series - CTD528

Hello, hello! I’m hostess today over on the Color Throwdown Challenge blog and for this week’s challenge I chose the cheerful colors of Aqua, Saffron, Brown and Yellow. I hope you’ll take the time to play along, I’d love to see what you create.
Today is the first day of my card series using the Rub-A-Dub-Dub stamp set by Lawn Fawn. Over the next few days I’ll be sharing several cards I created using this adorable set. 
For my card, I used the Lawn Fawn stamp set Rub-A-Dub-Dub along with the coordinating Rub-A-Dub-Dub dies. These colors seemed to work perfectly for a card with a tub full of splashing ducklings:) 
To create my card, I started out with a white card base, then I die cut a piece of Doodlebug yellow gingham paper, a piece of Knock on Wood Lawn Fawn paper and a piece of white cardstock using the Outside In Stitched Rectangle Stackables dies. Next I stamped my sentiment along the top of the white stitched rectangle and stamped the second half of my sentiment onto a white banner. I stamped all of my images and colored them with Copic markers then die cut them out. After that I adhered my brown wood paper and my sentiment banner then added the bathtub with foam tape. Once that was adhered, I stamped the splash marks on either side of the tub and then added the rest of my images popping up the large duck, soap and small duck outside the tub. To give some of the bubbles and watermarks a wet look, I added some Glossy Accents to the puddle, splash marks and some of the bubbles (see close up photos below).
For more inspiration, check out the design teams blog links below or you can go to the Color Throwdown blog for details on how to play along and see all of the sample entries in one location.

Amy Rohl
Amy Rysavy
Vicki Finger - January Guest Designer

Thanks so much for stopping by!

Don't forget, you can follow me on InstagramTwitter and Pinterest to see what I'm up to.

Wednesday, January 23, 2019

Hoppy Birthday - CTD527

Hello, hello! It’s Wednesday and time for a new Color Throwdown Challenge!
 Today I have a fun interactive card to share with you where I used the Lawn Fawn stamp set Toadally Awesome along with the coordinating Toadally Awesome dies. I used this week’s colors to give my card a more masculine/boyish feel and kept the focus on the main images within the circle.
 The first thing I did to create my card was to stamp my images from the Toadally Awesome set and color them with Copic markers then die cut them out. Once that was done, I used the Outside In Stitched Circle Stackables dies and die cut first one from white cardstock, then another from gray and white Doodlebug paper and then another from some blue gingham paper. Next I used the Simple Stitched Hillside Borders die to die cut the blue gingham paper and adhered the lily pad and stamped the black lines on each side. Next I adhered the gray and white paper to my die cut white cardstock circle. Then after arranging my images to the way I liked them, I used a pencil to mark where I wanted my little frog to pop up from and die cut the slot (first I die cut the slot in the circle and then die cut the slot in my background piece) and pieces to create my pop up using the Let’s Toast Pull Tab Add-On dies. (I did have to make adjustments to the tabs that my little frog was adhered to by cutting them down). I used foam tape to adhered the blue gingham piece with the log and cattails making sure not to put any in the path of my pop up and added my large from with more foam tape. For my background, I used a piece of Really Rainbow paper which I die cut using the Outside In Stitched Rectangle Stackables along with the tap from the Let’s Toast Pull Tab. I stamped my sentiment onto a banner and stamped the ribbit onto a speech bubble from the Chit Chat stamp set and die cut it out using the Chit Chat die.
For more inspiration, check out the design teams blog links below or you can go to the Color Throwdown blog for details on how to play along and see all of the sample entries in one location.

Amy Rohl
Amy Rysavy
Vicki Finger - January Guest Designer

Thanks so much for stopping by!

Don't forget, you can follow me on InstagramTwitter and Pinterest to see what I'm up to.

Wednesday, January 16, 2019

Skating Together - CTD526

Hello, crafty friends! It’s Wednesday and time for this week’s Color Throwdown Challenge where we have some frosty colors for all of us to create with.
 For my card, I used the adorable Hello Bluebird stamp set Skating Together along with the Skating Together dies to create a winter themed friendship card. I started out by using the coordinating Skating Pond Scene die and die cutting first the white frame and pond, then the trees from a strip of Knock on Wood paper and then the glittery snow from the Sparkle cardstock. After that I blended on some broken china oxide ink (which actually looks really light here after brightening up my photos) along the top of a white card base and used some tumbled glass distress ink along the edges of the pond piece. Next I stamped my images and colored them with Copic markers then die cut them out. I stamped my sentiment onto a Stitched Sentiment banner and die cut a bunch of snowflakes using the Mini Snowflakes dies. I popped up the two main images with foam tape, added some Wink of Stella glitter to their skates and added some clear rhinestones to the centers of some of the snowflakes.
For more inspiration, check out the design teams blog links below or you can go to the Color Throwdown blog for details on how to play along and see all of the sample entries in one location.

Amy Rohl
Amy Rysavy
Vicki Finger - January Guest Designer

Thanks so much for stopping by!

Don't forget, you can follow me on InstagramTwitter and Pinterest to see what I'm up to.

Wednesday, January 9, 2019

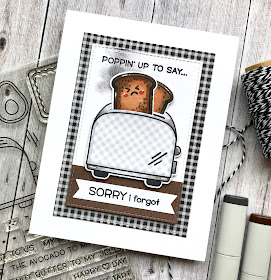
Sorry I Forgot..- CTD525

Hello there! Happy Wednesday! It’s time for this week’s Color Throwdown Challenge where we have some cozy colors for us to create with.
 I’m having fun lately using the new Lawn Fawn stamp set Let’s Toast along with the Let’s Toast dies and as I was looking at this week’s colors, I thought why not do something a bit funny. To create my card, I started out with a white card base, then added a piece of black and white check paper which I die cut using the Outside In Stitched Rectangle Stackables dies. After that I used the same dies to die cut a piece of white card stock and a small piece of Lawn Fawn Knock on Wood brown paper. Next I used my Misti tool to stamp part of my sentiment along the top of the white rectangle and stamped the other half of the sentiment from the Elphie Selfie stamp set onto a small white banner. Once that was done I stamped my images, stamping the toaster onto a piece of gray gingham Doodlebug paper and coloring all three pieces using copic markers. I wanted to make it look like smoke was coming out from the top of the toaster so I smudged a bit of black pastel in that area before adhering my toaster with toast using foam tape.
For more inspiration, check out the design teams blog links below or you can go to the Color Throwdown blog for details on how to play along and see all of the sample entries in one location.

Amy Rohl
Amy Rysavy
Vicki Finger - January Guest Designer

Thanks so much for stopping by!

Don't forget, you can follow me on InstagramTwitter and Pinterest to see what I'm up to.

Wednesday, January 2, 2019

Let’s Toast - CTD524

Hello and Happy New Year! I hope all of you had a wonderful holiday season.
Today the Color Throwdown team is back with a new challenge to start off the year and we have some fresh new color to create with. Before I get to my card, I’d like to welcome this month’s guest designer, Vicki Finger.
 For my card, I used the fun new Lawn Fawn stamp set Let’s Toast along with the coordinating Let’s Toast dies. To create my card, I started out with a white card base then added a piece of Lawn Fawn polka dot green paper which I die cut using the Outside In Stitched Rectangle Stackables dies. Next I used some Doodlebug paper, black herringbone and gray texture, and used a smaller rectangle to die cut them. After that, I stamped part of my sentiment in the upper left corner and the other half onto a white banner. Once that was done I stamped my images, stamping the toaster onto Doodlebug gingham paper, and colored them with copic markers then die cut them out. I also used the new Let’s Toast Pull Tab Add-On die so that I could make my toast actually pop out of the toaster which is super fun. After adhering all of my images to my card using foam tape, I used some white gel pen for highlights and added some glossy accents on the pit of the avocado.
For more inspiration, check out the design teams blog links below or you can go to the Color Throwdown blog for details on how to play along and see all of the sample entries in one location.

Amy Rohl
Amy Rysavy
Vicki Finger - January Guest Designer

Thanks so much for stopping by!

Don't forget, you can follow me on InstagramTwitter and Pinterest to see what I'm up to.